Roasted Pumpkin Seeds


Roasted pumpkin seeds, yummy!

Clean the seeds, then soak them in salt water, as shown here.

Once dry, drizzle with olive oil, add spices, bake in the oven.
I used sea salt only, and flipped the seeds after 7 minutes. I let them bake for 7 more minutes, then turned off the oven and let the seeds cool with the oven door open.
The result is wonderful. AMAZING taste!


Homemade Pumpkin Cappuccino


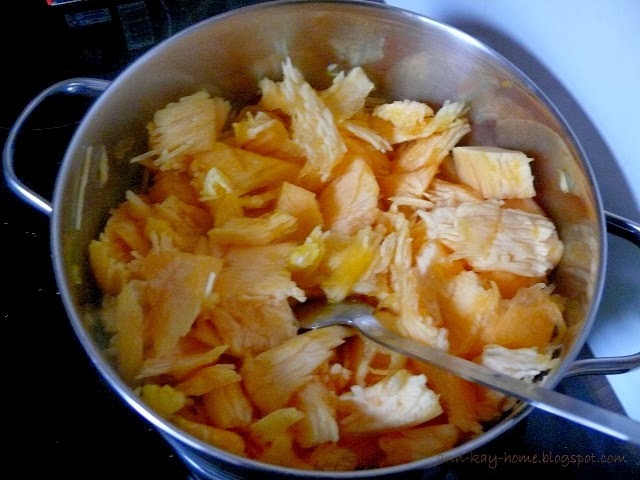
Yesterday, i carved our pumpkin, and for the first time in my life i actually wanted to reuse the filling and seeds.


The internet is full with great recipes: pumpkin bread, pumpkin muffins, pumpkin cupcakes, pumpkin everything...
And of course, the famous and popular Pumpkin Spice Latte. Latte is not my thing, but i love a good cappuccino.

Here is my version of a Homemade Pumpkin Cappuccino

At first, let's make pumpkin purree

1. Cut or tear pumpkin flesh into pieces
2. Add 1 cup of water, heat up and boil for 10 minutes


3. Let simmer 10 more minutes.


4. Blend


5. Let cool


Now let's make the cappuccino:

1. Brew hot coffee in a french press ( 2 large coffee spoons of coffee + 1/2 cup of water)


2. Heat up milk in the microwave ( 1 cup)
3. Pour 2-3 tsp pumpkin purree into a mug
4. Add spices ( nutmeg, cinnamon, sugar, cocoa)


5. Pour half of the hot milk into the mug


6. Use the rest to make milk froth and add it to the mug with a spoon


6. Carefully pour in the coffee


7. Decorate with powdered chocolate


8. Drink and enjoy!


Happy Sunday

Ugh, I'm getting lazy with writing Happy Sunday on a regular base. So instead of posting it weekly, I decided to post it once per month. Anyway, let's take a look at the past weeks.


1. The downstairs apartment is getting renovated, and our former neighbour left ( or forgot?) this amazing "Mädler" suitcase from the 1940's. A quick chat with the craftsmen, followed by an irresistable smile, and this beauty was mine :) For free.


2. Hello, awesome 17,5 kg Halloween pumpkin!


3. Our good old floor lamp passed away after 8 years of service. It's impossible to find a new one that is not either super ugly or costs a fortune.
This one is fun:


However, not what we were looking for. Sadly, we had no other choice but Ikea. It's quite pretty though.


4. Twix is Raider again?! Nostalgic flair at the grocery store.


5. I turned 34.


6. A great magazine for all paper lovers: "Made in Paper" is full of pretty photos and nice ideas


And a few more random photos:


Explore

Just a short break from Halloween, Christmas and Etsy.
Yesterday I did something i haven't done in months now: i scrapped a page. Just for fun and relaxation. No time pressure, no strict rules, no "it has to match the season". And a great way to use up my neverending pile of paper scraps.


Materials: Prima Sweet Fairy Collection "Blowing Kisses", Glitz Design Cashmere Dame "Chevron", glitter in gold and copper, gold glitter cardstock, washi tape, acrylic paint in gold, black and aqua


And this is the layout from the Prima blog:


Rotten Socks Halloween Poison Bottle


Before I could start this project, I had to reward myself with a bottle of ( more or less) good wine.

DIY Mini Paper Houses Part 3 - The Halloween Village


Part 1- Making Houses
Part 2 - The Christmas Village


I did not decorate the haunted houses - they are cute enough already. But i added the haunted tree and fence.


Unfortunately , i ran out of black cardstock, but that's nothing good old acrylic paint can't fix. Actually, the brush strokes make it look even more realistic.

DIY Mini Paper Houses Part 2 - The Christmas Village


Welcome to Part 2 of putz house making. Whew, what an adventure!

Yesterday, i played contractor and built the houses ( click here for Part 1), and today i want to show you how to make some cute details to decorate the houses. My inital plan was to decorate both villages, Christmas and Halloween, and for each house i have a story in mind of who lives there and whatnot.
But man! Making the christmas details took forever, and I'm extremely exhausted. So for now, i'll just leave the Halloween houses the way they are.

However, decorating is fun! Making mini doors, and window frames and shutters and wreaths and bows is fun! Adding snow and glitter is fun, of course!

DIY Mini Paper Houses Part 1


This is a project i've been wanting to make for a while now, for like two or three years, but somehow i never did and moved on to ( tons of) other ideas ideas instead.
But with Halloween and Christmas right around the corner, this is the perfect opportunity to kill two birds with one stone: create something that can be used for both hoildays, and get rid of paper scraps.


To be honest, there was a good reason i skipped this project for such a long time. Was it some mighty power from above? Destiny? Instinctive knowledge that i am in no way able to think dimensionally?
Ain't it funny how i am able to make flowers and all kinds of paper crafts literally within minutes, but then i struggle hard with those little houses? This is supposed to be a kids craft, isn't it? I don't think so...

Nonetheless, let me show you how i spent two ( 2!) full days making my paper putz houses.
Part 1 is dedicated to my battle with the buildings, and Part 2 is dedicated to the actual fun: decorating.

DIY: Hexagon Tea Light Holder


This is my first Halloween project. A tea light holder cut from black cardstock with my Silhouette Cameo, using this shape by one of my favorite designers: Patricia Zapata of "A little Hut".

Photo Canvas


One of MisterT's co-workers was lucky enough to celebrate his retirement last week. He threw a big party, and what could be a better gift than a distressed photo canvas?