
Showing posts with label Photography. Show all posts
Showing posts with label Photography. Show all posts


A Mini Summer Vacation Part II
The next day we explored our own city. Had not been to the "Hafencity" for a long time now, and boy, this place has become huge! It is now indeed a city within a city with dozens or perhaps even hundreds of new buildings, and still a giant construction area. Fantastic! Clearly i would not want to live there but the contrast between old and new is stunning in some way.
So, this post is mainly a collection of photos of architecture. You will notice that i have that strange preference for taking photos of building fassades from an angle. This is not very artistic and must seem boring to everyone else, but i enjoy it anyhow.
And no, i don't really care that my mother made fun of me because in her opinion i am silly and "act like some kind of super photographer" (<= original quote) just because i am not ashamed to lay down on the ground in public or almost sprain my spine in order to bring my eye's vision tofilm memory card.
I know that i am not a photographer! I own a six-year old non-SLR digital camera, i shoot in automatic mode most of the time because i am too lazy to adjust the settings manually, my photos are blurry because i rarely use the tripod for that same laziness reason, and my editing is minimal because my editing skills are minimal. I simply love photos plus i happen to prefer images of angles, fractions and reflections over shots of the entire building, alright??
Ok, then here we go:

So, this post is mainly a collection of photos of architecture. You will notice that i have that strange preference for taking photos of building fassades from an angle. This is not very artistic and must seem boring to everyone else, but i enjoy it anyhow.
And no, i don't really care that my mother made fun of me because in her opinion i am silly and "act like some kind of super photographer" (<= original quote) just because i am not ashamed to lay down on the ground in public or almost sprain my spine in order to bring my eye's vision to
I know that i am not a photographer! I own a six-year old non-SLR digital camera, i shoot in automatic mode most of the time because i am too lazy to adjust the settings manually, my photos are blurry because i rarely use the tripod for that same laziness reason, and my editing is minimal because my editing skills are minimal. I simply love photos plus i happen to prefer images of angles, fractions and reflections over shots of the entire building, alright??
Ok, then here we go:

A Mini Summer Vacation Part I

My parents are here to visit us and with rare sunny skies and warm 24°C
Four days off from work in a row is the most i can get this year, so this day at the beach was kind of like my mini summer vacation. My dad did a search on Google to find a hidden place where i could collect some driftwood and after a one-hour drive we ended up in the middle of nowhere. If you are a city girl like me, you cannot imagine the incredible quietness of this place. No traffic noise or humans let alone cars. Nothing but the chirping of birds and the soft whistle of the wind. Wonderful!
Advent Calendar #8 - No-Photoshop Silhouette Tutorial
Silhouette images are a cute huge trend and they make perfect gifts for christmas, other special occasions or as home decor. I have seen numerous tutorials on how to create them in Photoshop but i don't have Photoshop so i had to figure out another way.
In this tutorial i am going to explain how to create a silhouette using Picasa Photo Viewer and Microsoft Paint.
Picasa is free and can be downloaded here.
Paint is included in any Microsoft Operating System ( i do not know if Apple has a similar software included)


To make the silhouette ornaments above i edited two of our wedding photos, which i don't want to share here. I am going to use a photo of my saltdough starfish instead to show you the single steps, but the technique is indeed the same, no matter if you edit a face or a random item.
The tutorial might seem complicated at first but it is actually pretty easy and takes only a few minutes once you know what to do.
Instructions:
1. Always make a copy of the photo first! Never edit the original picture!
I once made the mistake of saving some unwanted changes to the original file accidentially but did not notice it right away. There was no way to undo the changes later on and the file was damaged forever.
Since then i always create a new folder where i can save the copied picture and transform it without any fear.
So, choose a picture, copy it into a new folder, rename it to avoid any confusion with the original file and open the new file in Picasa.
Click the "crop" button.

2. Select "manual" from the menu and crop the area around the person's head ( please envision the starfish as the head). Next click "Apply".

Picasa also has a "straighten" feature to trim a crooked photo. Please note: You must crop a larger section if you want to use that feature, because it actually zooms in.
Ugh, it's difficult to explain. So, this is what my image would look like after straightening it. See how it crops of my starfish's arms?

I would have to crop a larger section if i wanted to straighten the image.
But don't worry, you can crop and recrop and undo and fix every change any time as long as you do not save the file.
3. Once you're happy with the image section, save the cropped picture and open it in Paint.
I appologize for not being able to change the language settings in Paint, but i hope you can follow the steps anyhow.
Use the "free-form selection", left click at a starting point and draw your way around the head's shape without releasing the mouse button.


Once you are finished release the mouse button and click "crop" at the top of the page ( or right-click into the marked area and select crop).

The image should have a white background now and look somehow like this:

As you can see i did not work too precisely but it doesn't matter so far.
Save the photo.
4. Now leave Paint and open the cropped image in Picasa again. Select "Effects" and turn the picture into black and white using the "B&W" button.


5. Switch to the "Tuning" section and increase the shadows by dragging the level rightwards.

The image is still not dark enough, so you have to repeat this step. To do so, simply click into the "Effects" section then switch back to "Tuning" immediately. As you can see this little trick allows you to drag the level again.
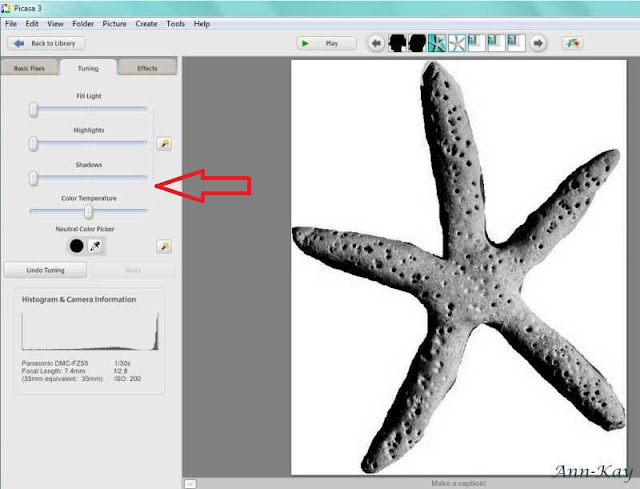
Repeat a few times until your image has a deep black saturation, then save it.

Instead of the "save" function i use "save as" now to get an extra copy, just to be on the safe side.

6. You can clearly see the result of my previous sloppiness. I need to go back to Paint and use the eraser tool and correct those imperfections to sharpen the edges.

Looks good enough and i can save the image just the way it is now.
And that's it!
This is the exact same technique i used to create the silhouettes of MisterT and me.

Now you can print your silhouette image and transfer it to canvas, cardboard, porcelain, clay or paper and create wonderful christmas gifts, ornaments, tags, greetings cards, dinner plates, coffee mugs or anything that comes to your mind.

This tutorial is linked up to my favorite Linky Parties and the CSI Project's Handmade Ornament Challenge

In this tutorial i am going to explain how to create a silhouette using Picasa Photo Viewer and Microsoft Paint.
Picasa is free and can be downloaded here.
Paint is included in any Microsoft Operating System ( i do not know if Apple has a similar software included)


To make the silhouette ornaments above i edited two of our wedding photos, which i don't want to share here. I am going to use a photo of my saltdough starfish instead to show you the single steps, but the technique is indeed the same, no matter if you edit a face or a random item.
The tutorial might seem complicated at first but it is actually pretty easy and takes only a few minutes once you know what to do.
Instructions:
1. Always make a copy of the photo first! Never edit the original picture!
I once made the mistake of saving some unwanted changes to the original file accidentially but did not notice it right away. There was no way to undo the changes later on and the file was damaged forever.
Since then i always create a new folder where i can save the copied picture and transform it without any fear.
So, choose a picture, copy it into a new folder, rename it to avoid any confusion with the original file and open the new file in Picasa.
Click the "crop" button.

2. Select "manual" from the menu and crop the area around the person's head ( please envision the starfish as the head). Next click "Apply".

Picasa also has a "straighten" feature to trim a crooked photo. Please note: You must crop a larger section if you want to use that feature, because it actually zooms in.
Ugh, it's difficult to explain. So, this is what my image would look like after straightening it. See how it crops of my starfish's arms?

I would have to crop a larger section if i wanted to straighten the image.
But don't worry, you can crop and recrop and undo and fix every change any time as long as you do not save the file.
3. Once you're happy with the image section, save the cropped picture and open it in Paint.
I appologize for not being able to change the language settings in Paint, but i hope you can follow the steps anyhow.
Use the "free-form selection", left click at a starting point and draw your way around the head's shape without releasing the mouse button.


Once you are finished release the mouse button and click "crop" at the top of the page ( or right-click into the marked area and select crop).

The image should have a white background now and look somehow like this:

As you can see i did not work too precisely but it doesn't matter so far.
Save the photo.
4. Now leave Paint and open the cropped image in Picasa again. Select "Effects" and turn the picture into black and white using the "B&W" button.


5. Switch to the "Tuning" section and increase the shadows by dragging the level rightwards.

The image is still not dark enough, so you have to repeat this step. To do so, simply click into the "Effects" section then switch back to "Tuning" immediately. As you can see this little trick allows you to drag the level again.

Repeat a few times until your image has a deep black saturation, then save it.

Instead of the "save" function i use "save as" now to get an extra copy, just to be on the safe side.

6. You can clearly see the result of my previous sloppiness. I need to go back to Paint and use the eraser tool and correct those imperfections to sharpen the edges.

Looks good enough and i can save the image just the way it is now.
And that's it!
This is the exact same technique i used to create the silhouettes of MisterT and me.

Now you can print your silhouette image and transfer it to canvas, cardboard, porcelain, clay or paper and create wonderful christmas gifts, ornaments, tags, greetings cards, dinner plates, coffee mugs or anything that comes to your mind.

This tutorial is linked up to my favorite Linky Parties and the CSI Project's Handmade Ornament Challenge


DIY: Canvas #2
This is another canvas for my sister with a photo taken by her significant other on their trip to New York
( click here to read my tutorial and see the other canvas i made for her).
The editing took quite a while because i had to remove the time stamp that covered the lower left part of the picture. What normal person takes photos of NYC, the city of all cities, without disabling the time stamp?!?!?
Anyway, it has the look of a vintage black and white photo now and i know she will love it!

( click here to read my tutorial and see the other canvas i made for her).
The editing took quite a while because i had to remove the time stamp that covered the lower left part of the picture. What normal person takes photos of NYC, the city of all cities, without disabling the time stamp?!?!?
Anyway, it has the look of a vintage black and white photo now and i know she will love it!

DIY: Distressed Photo Canvas Tutorial
I said i did not want to write one, but due to my previous post there have been lots of traffic referrals on my blog lately of people searching Google for a distressed canvas tutorial, and since some of my christmas presents will be handmade canvases this year, i decided to post yet another how-to.
It is actually pretty easy and a great and inexpensive way of turning your own photography into a unique piece of artwork. The smudged ink creates a wonderful aquarelle look.
This photo of the star-spangled banner will be one in a series of gifts for my sister who had been to New York and Miami recently and now is a huge fan of both cities. Here is the original picture that i took at the Beach Patrol Headquarters in South Beach in 2009:

And this is what i want it to look like in the end. Nice pop of colors after playing around in Picasa:

However, the final result will be less colorful because most of the ink gets peeled off.
Now let's move on to the tutorial.
Materials:
- canvas ( who would have guessed?)
- photo ( obviously)
- inkjet printer and one sheet of regular printer paper ( copy paper)
- Mod Podge, or in my case the homemade equivalent. I simply call it glue.
- a good paintbrush. Don't take one that loses one of their hairs every three seconds or you will end up having those nasty little bristles all over your canvas
- a credit card or similar. I used my Ikea Family card and i'm pretty sure you have one, too!
- water, old towel and a cloth or sponge
Logically, the canvas should not be larger than your image section.

Instructions:
The most important step before you print the photo is to mirror it and adjust its size according to the measurements of the canvas. And i already mentioned that the colors will turn pale, so it makes sense to increase the saturation just a little bit. I use Picasa to edit and Irfan View to print my pictures, both are free and easy!

So, print the photo and cut off the white margin.

Apply a blob of glue and generously cover the entire surface of the canvas.


Place your photo on the canvas with the print side facing down.

Now carefully straighten the surface with your credit card or use your finger or paintbrush to smoothen any bumps and wrinkles. I actually liked them in this case and thought they might add an interesting touch. It's a distressed style after all.
So i pressed them down just a little bit but did not flatten the paper completely.

Up next cover the entire canvas with another coat of glue ( again, carefully or the paper will rip as you can see in my photo above) and let it dry over night. It dries faster if you put it on or near a radiator.

Once the glue is dry, wet and dab the surface with a cloth or sponge, let it soak up the water, then start rubbing the corners of the canvas. It can take a few minutes before the paper begins to peel off but once it does you can easily rub it down and even pull off larger fractions. Continue until the entire canvas is paper-free and don't hesitate to damp it again should it become to dry.
This step takes approximately 30 minutes, depending on how well the paper sticks to the canvas.


Now wipe away all those tiny paper shreds with a towel or your hand, let the canvas dry again completely and scrape off any remaining paper crumbs with your fingernail.
Lastly, apply a thin coat of ( matte) Diamond Paint Finish or Crystal Clear Spray ( e.g. Krylon) to seal the ink, intensify the colors and protect your artwork from yellowing.
And that's it!

This project is linked up to my favorite Linky Parties
It is actually pretty easy and a great and inexpensive way of turning your own photography into a unique piece of artwork. The smudged ink creates a wonderful aquarelle look.
This photo of the star-spangled banner will be one in a series of gifts for my sister who had been to New York and Miami recently and now is a huge fan of both cities. Here is the original picture that i took at the Beach Patrol Headquarters in South Beach in 2009:

And this is what i want it to look like in the end. Nice pop of colors after playing around in Picasa:

However, the final result will be less colorful because most of the ink gets peeled off.
Now let's move on to the tutorial.
Materials:
- canvas ( who would have guessed?)
- photo ( obviously)
- inkjet printer and one sheet of regular printer paper ( copy paper)
- Mod Podge, or in my case the homemade equivalent. I simply call it glue.
- a good paintbrush. Don't take one that loses one of their hairs every three seconds or you will end up having those nasty little bristles all over your canvas
- a credit card or similar. I used my Ikea Family card and i'm pretty sure you have one, too!
- water, old towel and a cloth or sponge
Logically, the canvas should not be larger than your image section.

Instructions:
The most important step before you print the photo is to mirror it and adjust its size according to the measurements of the canvas. And i already mentioned that the colors will turn pale, so it makes sense to increase the saturation just a little bit. I use Picasa to edit and Irfan View to print my pictures, both are free and easy!

So, print the photo and cut off the white margin.

Apply a blob of glue and generously cover the entire surface of the canvas.


Place your photo on the canvas with the print side facing down.

Now carefully straighten the surface with your credit card or use your finger or paintbrush to smoothen any bumps and wrinkles. I actually liked them in this case and thought they might add an interesting touch. It's a distressed style after all.
So i pressed them down just a little bit but did not flatten the paper completely.

Up next cover the entire canvas with another coat of glue ( again, carefully or the paper will rip as you can see in my photo above) and let it dry over night. It dries faster if you put it on or near a radiator.

Once the glue is dry, wet and dab the surface with a cloth or sponge, let it soak up the water, then start rubbing the corners of the canvas. It can take a few minutes before the paper begins to peel off but once it does you can easily rub it down and even pull off larger fractions. Continue until the entire canvas is paper-free and don't hesitate to damp it again should it become to dry.
This step takes approximately 30 minutes, depending on how well the paper sticks to the canvas.


Now wipe away all those tiny paper shreds with a towel or your hand, let the canvas dry again completely and scrape off any remaining paper crumbs with your fingernail.
Lastly, apply a thin coat of ( matte) Diamond Paint Finish or Crystal Clear Spray ( e.g. Krylon) to seal the ink, intensify the colors and protect your artwork from yellowing.
And that's it!

This project is linked up to my favorite Linky Parties
Subscribe to:
Posts (Atom)