Showing posts with label Mod Podge. Show all posts

DIY Glitter Deer Head Mod Podge Makeover


DIY Glitter Deer Head Mod Podge Makeover

A glitter deer head of some kind had been on my DIY Christmas decoration list for years, so naturally this little ornament landed in my cart as soon as I saw it.
It was the last one, and looked a bit shabby already, with glitter coming off around the nose, but who cares for 79 Cent. Nothing a bit of extra glitter and Mod Podge can't fix, right?

DIY Mini Paper Houses Part 2 - The Christmas Village


Welcome to Part 2 of putz house making. Whew, what an adventure!

Yesterday, i played contractor and built the houses ( click here for Part 1), and today i want to show you how to make some cute details to decorate the houses. My inital plan was to decorate both villages, Christmas and Halloween, and for each house i have a story in mind of who lives there and whatnot.
But man! Making the christmas details took forever, and I'm extremely exhausted. So for now, i'll just leave the Halloween houses the way they are.

However, decorating is fun! Making mini doors, and window frames and shutters and wreaths and bows is fun! Adding snow and glitter is fun, of course!

Photo Canvas


One of MisterT's co-workers was lucky enough to celebrate his retirement last week. He threw a big party, and what could be a better gift than a distressed photo canvas?

DIY: Coin Purse Makeover with Paint and Washi Tape Birds


My inspiration was this super cute wallet by Natural Life:

Photo by www.naturallife.com


Sadly, the shop does not ship internationally, so i had to create my own birdie wallet with paint, washi tape, paper and Mod Podge.

Sketch Challenge: Eco-friendly Wedding Album Page

I have been working on my DIY wedding scrapbook album for a while now, and the pages are slowly beginning to look nice. A few days ago i stumbled upon Scrap 365 and decided to participate in their monthly sketch challenge. I have never created a page based on a sketch, but it was fun and i think it is fascinating how everyone ends up with a completely different result based on the same layout. It's like Ikea furniture: everyone buys the same items, but no two rooms look the same.

This is the sketch:


And this is my result:


It is one of my "Getting Ready" pages. The zipper of my dress did not close in the first place, and in my best hysterical voice i yelled something like "Oh my God, it DOES.NOT.FIT!!!!" But of course it did, and these photos show my relief-after-panic laughter.

The layout looks a bit cramped because i'm trying to craft as eco-friendly as possible and prefer to cut my pages from used food packaging ( cereal boxes and such). Moreover, i really like that imperfect look.
So the size is only A5 instead of 12x12 ( 30x30).

I did not take photos while creating the page, as it was already late in the evening and dark outside, and nobody wants to see crappy pictures taken under artificial light ( nobody wants to see photos of my messy craft table aka our dinner table either). But this is what i did:

Although i have a huge stash of pretty, gorgeous, to-die-for scrapbook paper i rarely use it because it is too pretty and precious and i rather keep it for that one perfect occasion one day ( sounds familiar?). So for this layout i used pieces from my "junk paper" stash. Yes, i am of of those people who keep the wrapping paper from gifts they receive, because you know, it can be ironed and reused.

Those of you who have been following my blog for a while already know that turquoise is my favorite color and that we had a destination beach wedding in Florida; choosing our wedding color was an easy and given task. Therefore the album pages will mainly be in shades of turquoise and white.

So, at first i covered the piece of cardboard with Sparkle Mod Podge and a white paper napkin. Once it was dry i covered the napkin with turquoise crepe paper. Crepe paper is awesome because it is not color-fast, and applying a mixture of Mod-Podge and water creates a wonderful crinkled water-color effect.
The brown paper is baking paper and the turquoise paper is said used gift wrapping paper, both ripped into pieces. The white paper is actually paper twine that i untwisted.
The dots are punched from those papers too, and i included a few dots punched from an old craft catalog. I wanted to punch the baking paper as well, but it did not work and almost destroyed the punch. So, don't try that! Also, baking paper does not stick well because of its non-adhesive surface, so you have to sand it first with a rough sandpaper.
The "i do" sticker is one of the first things i cut with my new Cameo from a recycled piece of vinyl ( a leftover from a wall decal sheet). The dimensional effect is created with a  transparent pearl pen.
I also included bits of burlap. Those are from a cake topper i tried to make for my Etsy shop, but it was a fail.

By the way, Sparkle Mod Podge is awesome! At first i had no idea what to do with it, but now i LOVE it, especially in combination with turquoise!


So, that is my first sketch layout ever. What do you think?
I know it's not perfect and i could have done much better, but sticking to a determined layout is completely different from scrapping freestyle and it is actually much more difficult than i thought. But i like it anyway, and after all, scrapping is not about perfection but about the process and having a great time while crafting.

I will be sharing more pages once the album is finished. Next year or so.

DIY: Love Birds Love Lock Tutorial

This is the tutorial for the "Love Birds Love Lock" i made for our first anniversary.


Total Time: ca 1 hour

Materials:

- Padlock
- Mod Podge
- Permanent Marker
- Scissors
- Paint brush
- Fabric 

A few tips beforehand:

- I used Sparkle Mod Podge because this is the only kind of Mod Podge i have *sad face*, but i think you can use any other formula as well.
-  a solid cotton-like fabric seems to work best. I tried satin at first, but it was too flimsy and did not stick well
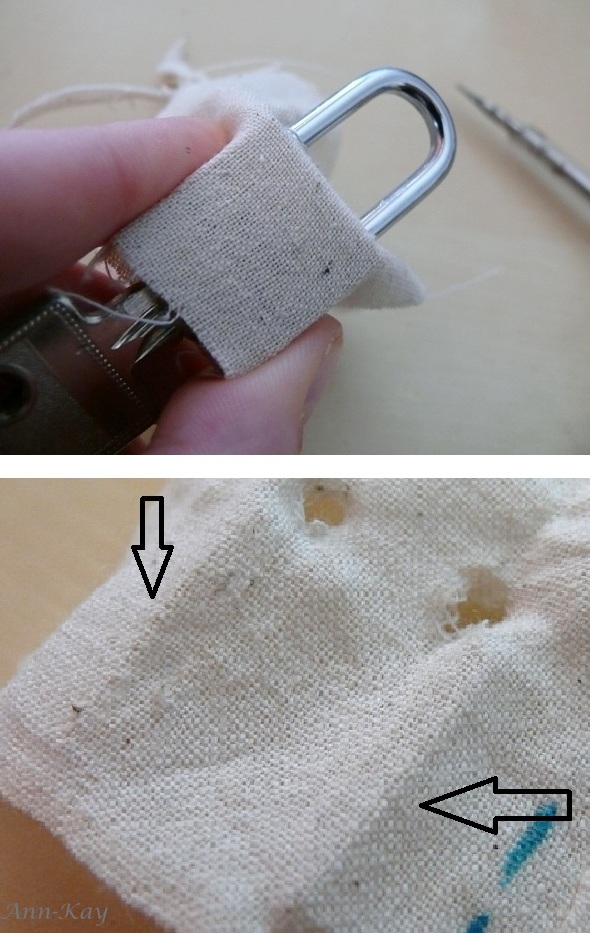
- test your marker on a non-visible part of the fabric before you start. As you can see in photo below i wanted to use a turquoise marker, but it blurred and i had to use another one. 


Instructions: ( it's a bit difficult to explain, but i hope the description is halfway coherent nonetheless)


1. First cut a small piece of fabric, a bit larger than twice the size of the lock


2. Cut a tiny hole into the middle of the fabric and insert the shackle of the padlock
3. Now push down the shackle as far as possible to mark the position of the second hole, remove the fabric and make a small cut for that hole.


4. Pull the fabric over again and stretch it around the edges of the padlock. This will create creases to mark the area in which you can draw/write


 5. Draw your sketch, names, date or whatsoever, pull the shackle through fabric again, then cover the front and back of the lock with Mod Podge and flap down the fabric.


6. Cut two slits on both sides of the lock, apply Mod Podge and press down the fabric. Apply more Mod Podge and fold down the rest of the fabric. It's like wrapping a gift.


7. Cut off any excess fabric, apply a generous coat of Mod Podge all around the lock, then hang dry. I used a wooden skewer inserted into a drawer


8. Mod Podge is not waterproof, so once it has dried completely ( after ca. 24 hours) you need the cover the locket with a water-resistant sealant, e.g. Crystal Clear Spray

And that's it!

DIY: Dried Flower Canvas #2 - Tulips

Here's another tutorial about how to turn a dried flower bouquet into an individual piece of artwork.


Materials:

- dried tulip bouquet
- paint brush and sponge
- acrylic paint in turquoise, yellow, red and green
- Mod Podge ( or similar)
- large sheet of paper matching the size of the bouquet ( or a canvas)


The best way to dry tulips is to just let them sit in the vase until the blossoms are completely dry. Pay attention to the water though and pour away when it turns dull, otherwise it might mold.

1. To create a contrasting background, mix blue acrylic paint with a drob of water, dunk in a paintbrush and splash the paint onto the paper/ canvas. No need to be precise, just feel and act like a five-year-old again, whee!

2. Let dry, then use a sponge to cover the entire surface with Mod Podge.


3. Now carefully place the bouquet on top of the paper and immediately press it down with a flat and solid item. Smart people use a book, unprepared dummies grab the next best thing they can find ( e.g. a paint brush package).
Make sure all the petals get in contact with the Mod Podge


4. Up next, dab the flowers with Mod Podge. It is important that all the petals keep sticking to the paper/ canvas, otherwise they will fall down once you hang your piece of artwork.


Let dry completely for ca. 1-3 hours. In the meantime, wash your sponge and paintbrush.

4. Now you can paint the flowers.
Mix different hues to achieve a vivid and more realistic look. In addition to yellow i applied a red color to make my flowers look like parrot tulips.
For the stems, start with a dark green and put some highlights with a brighter shade.


5. Again, let the paint dry completely.

6. As a final step, insert the sheet of paper into a glassless frame and hang it up.


And that's it!


This project is linked up to my favorite Linky Parties

DIY: Dried Flower Canvas

Today i will be decking the halls, create our advent wreath, make some DIY christmas decoration and listen to christmas music all day long.  So this is probably my last non-christmas project for this year:
Dried and painted flowers on a canvas.


It is made from the bouquet that MisterT gave me on our six months anniversary. To avoid confusion:
This tutorial was orginally written for my Wedding Blog, but i am thinking about shutting down that  blog and simply copied the entire text. So, here it is:


I'm ultra excited to finally be able to share a project that i started several weeks ago. This a tutorial on how to turn your bridal bouquet into your own unique piece of art.

Many companies offer numerous kinds of flower preservation; i think the most common keepsakes are freeze dried and pressed bouquets in a pretty frame or shadowbox, floral candles or my personal favorite and inspiration: a canvas, like these darling creations by Curly Art and Flowers Into Paintings.

This painting is not intended to copy a professional's amazing work ( obviously), but hopefully a helpful suggestion for brides on a budget who want to create their own keepsakes.
It is meant to inspire you, encourage your creativity and to show you what you can make with parts of your bouquet instead of throwing it away.

I threw mine away because we had a destination wedding, hence enough wedding items that filled up our luggage space. It included nothing but white roses and honestly, i can easily buy those flowers here anytime and would not even notice the difference.
But i wanted to keep the pretty bouquet that my husband gave me on our 6 months anniversary as i felt more emotionally attached to it than to my wedding flowers.

So for this tutorial let's just pretend this is my bridal boquet:


A few more words beforehand:

- Your flowers will not look like they used to while being fresh.
- This method does not actually preserve the flowers and keep them from wilting. It is not comparable to a professional preservation but a simple homemade drying method
- It probably does not work for large and solid flowers like succulents
- Roses, Dahlias, Callas and Carnations can better be dried "normally". They might shrink but do not lose too much of their actual shape
- Start drying the flowers before they start to wilt
- You might want to pratice with some less meaningful flowers before the big day to get a feeling for the technique and find out if this DIY option is the right choice for you.


Materials:

Part 1:
- Flower Bouquet
- 1 large heavy book, and a few more heavy books and photo albums
- Scissors
- 1 sheet of Transparency Film with a removable paper-back, like the one that teachers use on overhead projectors. Use 2 or more sheets for a larger canvas

Part 2:
- your dried flowers
- A canvas, about the same size as the transparency foil
- Mod Podge

I make my own Mod Podge ( see the instructions on Do It Yourself Divas)
However, i recently read that the DIY equivalent can start to yellow after a few years hence it might make sense to buy the real Mod Podge for this project.

Part 3:
- Paint & Paintbrushes
- Clear Sealant


Instructions:

Part 1:

Open a page in the last third of your large heavy book, place the sheet of transparency film on it and lift up the foil.


Cut off the stem as close to the blossom as possible and arrange all blooms on the sheet of paper. Some flowers will fall apart but you can still use the single petals.


Then flap down the foil and push it down with one hand while you close the book. ( I asked my husband to help me to make sure the flowers would not get out of place)


Put your book into a safe place, add extra weight with additional books and photo albums, and leave it alone for at least one week. Two weeks are even better to make sure the flowers are well dried.


Part 2:


- Cover the canvas with a mighty thick layer of Mod Podge


- Place your flower sheet onto the canvas, carefully and accurately. You have only one try as the paper will stick immediately.


- Press down the foil with one hand while your other hand holds the bottom side of the canvas to create a back-pressure. It is important that the paper soaks up as much glue as possible, therefore press until the entire paper is pretty damp to make sure it keeps sticking. The stickiness is the base of this creation. Use your finger to smoothen the wet paper if you mind the bumps and wrinkles ( i didn't)

- Lift up the foil slowly but do not tear it off yet, just put it aside. Gently pull off any sticky petals and place them into their final postion. Intact flowers can carefully be pushed with a finger, as well as any small crumbs.


- Now you can start covering the flowers with Mod Podge. They are quite liquid-repellent, so do not hesitate to "drown" them in glue.
I used two different techniques: at first i held the single petals with one finger, dipped the paintbrush into the glue and applied it as if i would paint the petals.


The Gerbera Daisies were still intact and i could easily lift them up and apply some glue on their bottom, put them back onto the canvas and drip a fairly large blob on the bloom. Then i dabbed the daisies carefully until they were fully covered with glue.


In the end i dabbed the entire canvas with more glue:


Now you can tear off the transparency film and let the canvas dry thoroughly. I waited three days before i proceeded, just to be on the safe side.

Once everything is dry and save you can trim the paper with scissors or a x-acto knife. I left a margin and glued it to the sides of the canvas with normal glue.


Part 3:

Be creative!

I worked with water paint, oil paint, acrylic paint, glitter and scrapbooking stickers. Moreover i added the Calla Lilly that i had dried seperately.
You can also add rhinestones, doilies, scrapbooking paper, stencils, lace, photos, construct a frame from border stickers,... . Use anything that comes to your mind!

I simply mixed my paint in a color range that would partly match the former bouquet and started covering the flowers and background without having an actual plan. Once i was happy with the result i let the canvas dry for one more day and finally sealed my artwork with a coat of matte Crystal Clear Spray.

You will get different effects by using a variety of paintbrushes and mixing colors of different consistency, e.g. use a soft brush to apply "thin" watery color, and a dry painbrush and solid paint to create highlights.

See this pin and learn how to create different watercolor textures with household items.


Lastly, a few more ( not so appetizing photos) that i took while painting and arranging.


And again the final result: