Showing posts with label Paper Crafts. Show all posts

DIY "Always kiss me goodnight" Print


Those of you who follow me on Pinterest already noticed my latest obsession with pretty prints. Wish i could buy them all, but i have to stay frugal, so this is a simple and easy DIY print created with Microsoft Word. The font is Segoe Script in cursive and the size is 48.
I am currently revamping our bedroom, getting rid of too much red (curtains, pictures, bedding) and replacing it by black and white. Clean, modern and simple. This print replaces the old red one, that i tossed this morning.


Rotten Socks Halloween Poison Bottle


Before I could start this project, I had to reward myself with a bottle of ( more or less) good wine.

DIY Mini Paper Houses Part 3 - The Halloween Village


Part 1- Making Houses
Part 2 - The Christmas Village


I did not decorate the haunted houses - they are cute enough already. But i added the haunted tree and fence.


Unfortunately , i ran out of black cardstock, but that's nothing good old acrylic paint can't fix. Actually, the brush strokes make it look even more realistic.

DIY Mini Paper Houses Part 2 - The Christmas Village


Welcome to Part 2 of putz house making. Whew, what an adventure!

Yesterday, i played contractor and built the houses ( click here for Part 1), and today i want to show you how to make some cute details to decorate the houses. My inital plan was to decorate both villages, Christmas and Halloween, and for each house i have a story in mind of who lives there and whatnot.
But man! Making the christmas details took forever, and I'm extremely exhausted. So for now, i'll just leave the Halloween houses the way they are.

However, decorating is fun! Making mini doors, and window frames and shutters and wreaths and bows is fun! Adding snow and glitter is fun, of course!

DIY Mini Paper Houses Part 1


This is a project i've been wanting to make for a while now, for like two or three years, but somehow i never did and moved on to ( tons of) other ideas ideas instead.
But with Halloween and Christmas right around the corner, this is the perfect opportunity to kill two birds with one stone: create something that can be used for both hoildays, and get rid of paper scraps.


To be honest, there was a good reason i skipped this project for such a long time. Was it some mighty power from above? Destiny? Instinctive knowledge that i am in no way able to think dimensionally?
Ain't it funny how i am able to make flowers and all kinds of paper crafts literally within minutes, but then i struggle hard with those little houses? This is supposed to be a kids craft, isn't it? I don't think so...

Nonetheless, let me show you how i spent two ( 2!) full days making my paper putz houses.
Part 1 is dedicated to my battle with the buildings, and Part 2 is dedicated to the actual fun: decorating.

DIY: Hexagon Tea Light Holder


This is my first Halloween project. A tea light holder cut from black cardstock with my Silhouette Cameo, using this shape by one of my favorite designers: Patricia Zapata of "A little Hut".

DIY: Washi Tape Paper Flower Wreath


The first project i shared here on my blog was a wreath. Back then, i did not care for wreaths at all and thought they were stupid, but within the past two years my taste has changed and i LOVE wreaths!

Wreaths are beautiful, gorgeous, stunning, fun, seasonal, ...
I have an entire Pinterest board dedicated to wreaths, and at every link party, photos of wreaths are the first ones that catch my attention. Not only are the wreaths freaking fabulous, but so are the creativity and skills of the people who create those wreaths!


DIY: Funfetti made from paper scraps


I spent the last few days making dozens of paper flowers, and as always when i craft with paper i end up with a huge pile of scraps. But you know me; i can't bring myself to throw away this pretty patterned junk, so i turned them into "Funfetti" instead.


The cutting process itself is not so much fun and a bit nerve-wrecking, but a few hours and lots of schnipp schnapp schnipp later, i could not be happier with the result of my DIY colorful, fun and eco-friendly confetti.


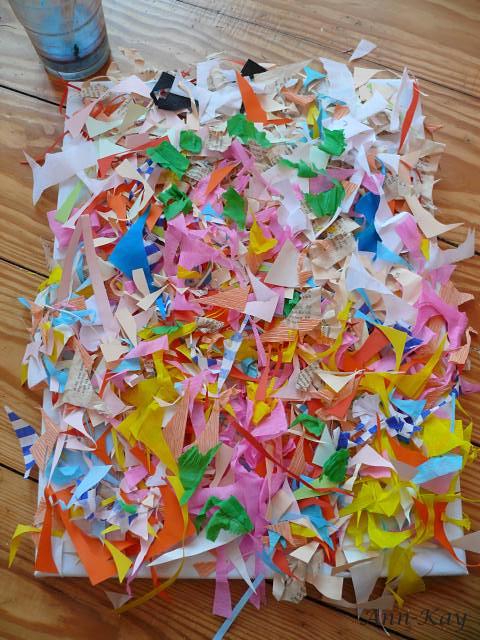
DIY: Paper Scrap Canvas Part I


Everyone who crafts with paper and fabric frequently knows this problem: What to do with all those scraps that are left over after cutting the paper/ fabric?
On the one hand you want to throw them away, but on the other hand they are too pretty and some of the paper/ fabric once cost a fortune.


My initial solution: Keep them in an empty shoe box.

Then wait for that special day of the year when your are getting so sick and tired of keeping every single bit of junk in empty shoe boxes. Now grab those scraps, a canvas, lots of Mod Podge, some water and a large paint brush or sponge, and create a fun and colorful unique piece of art.


1. Mix Mod Podge with some water ( my mixture is blue from a previous scrapbook project)
2. Generously apply that mixture to the canvas


3. Cover the canvas with your paper/ fabric scraps. Again, be genereous. You want to get rid of all of them ( because you need the shoe box to store other junk craft supplies)


4. Apply more of the Mod Podge-water mixture until the entire canvas ( and every single scrap) is covered. Drown the scraps by carefully dabbing and pressing them down with a sponge.


5. Let dry for a couple of days.

And that's it!


Stay tuned for Part II, where i am going to show you how i used some spray paint and acrylic paint and turned this canvas into a pretty beach-inspired painting.

FEATURED!!!!

Remember back in January when i mentioned my preparations for my parents' anniversary surprise party?
I haven't posted any photos of the party yet beeeeecause... i submitted it to Hostess with the Mostess and it got FEATURED today!!!

Man, i am so excited to see my tiny event over at this amazing and inspiring super-blog!!! Even more so because i basically created everything out of nothing and materials i already had.

to see the feature

and 
to see all photos


And a photo of me hanging up those giant paper flowers:


Valentine's Tree


My Valentine's day decoration: Three branches in a vase, decorated with tags made of hand-made paper.


Update: My tree won the Plaid Twitter Valentine's Contest, yay!!!

Party Preparations

Ha, I exceeded myself organizing and stowing the christmas decoration! I managed to pack it into two boxes instead of four, plus a small one for the ornaments.  The living room looks so much brighter and bigger now without all that junk and the massive tree.

I wish i had more time for blogging at the moment but there isn't much to write about anyway, as i am busy, busy, busy preparing the wedding anniversary. Right now MisterT is scanning old photos of my parents while i'm in the process of making giant paper flowers from old newspaper as wall decor. But i have no idea how and when and where to spray-paint them, as there is a heavy storm and rain going on, which prevents me from working outside on the balcony.
Time is running out and i am not so sure if i will be able to put all my ideas into action. I have tons of ideas and gathered every silver item i could find, so in the end this party probably won't cost anything except the costs for champagne and some food.


So excited and looking forward to seeing my parents' reaction!

DIY: "Spoo-Key" Book Pages Halloween Bunting


Total Costs: 0€

Total Time: 15 minutes

Materials:

- Tea & coffee dyed book pages
- Yarn
- Black permanent marker
- Red candle
- Lighter
- Tape


Instructions:

1. Burn the edges of tea- and/or coffee-stained book pages. The best place to do so is by the water-filled kitchen or bathroom sink to avoid fire!
2. Hand-letter the pages. ( I did a Google search to find a nice image that i could use as a model for the skeleton key)
3. Light a red candle and drip some wax onto the pages
4. Crease the top of each page and attach them to the yarn. Fix the paper with a small piece of tape.


And that's it!


This project is linked up to some of my favorite Linky Parties

DIY Retrospect: My first Scrapbooking Project

A friend of mine gave birth to her first child last year and i wanted to give her a personal and handmade keepsake gift to display somewhere in her home.
I had a rough idea of framing a photo but i couldn't decide how to make it and what else to use for decoration other than blue ribbons and stuff. Every time i started working on it i felt like it didn't look good and wasn't special enough.
It took me a whopping three months and several cancelled attempts until a vision appeared. Finally.
Admittedly a bit later than orginally planned but still two weeks before christmas!

Now with my vision in mind i spread my utensils on the floor ( my favorite way of working on projects) and started cutting and glueing and overlapping and rearranging various kinds of paper and ribbons and embellishments.


I experienced such a flow that i worked four hours straight without a break until it was completely finished. Wow, i have never been that busy with one my crafts. (not good for my poor back though...)
It turned out quite nice considering that it was my first scrapbooking approach ever.

Baby Boy's face is edited for privacy reasons


In any case, my friend and her fiance liked it a lot and said it was so much more thoughful and prettier than the gift from their little boy's godmother and it would get the most special place in his room.

Now, isn't that a wonderful compliment?

DIY: Upcycled Milk-Box Paper Lantern

I while ago i stumpled about a video tutorial that shows how to make a paper lantern from an empty milk box.
That is a nice inexpensive and eco-friendly fall project and a great way to reuse old milk or juice boxes!

                                                                     Click HERE to see the video

DIY: Easy Mirror Makeover


The object of hate: IKEA "Ram" Mirror with wooden frame, 7€

Photo by IKEA


However, not the untreated version but the very special lousily-painted-by-Ann-Kay-version:


I think my original idea was to create some kind of carribean vibe in our old apartment's hallway, therefore i wanted a turquoise mirror. Unfortunately the paint turned out yucky green and i opted to put my awesome stupid idea on ice.
That ugly green thing stands in our bedroom now, which is mainly decorated in red and white hues. As you can tell from the curtain's reflection in the mirror this not a pretty color combination, at all. Time for a makeover!


Total material costs: 2€
( I don't include the costs of my mirror here because i bought it several years ago and it's 'paid off' already)

Time: a few hours ( anything between 2 and 6 hours, depending on how concentrated and motivated you are)

Level of difficulty: Easy.
Not a kids project though! Working with the hot glue gun needs some concentration and skills as the hot glue can cause severe burns

Materials/ Tools:

- 1 ugly old mirror
- 1 full roll of white Crepe Paper ( 1€)
- Hot Glue Gun + at least 2 hot glue sticks
- Pre-used thick cardboard. I used a fruit packing box from a grocery store
- Scissors
- Paper Twine or Raffia or anything similar (1€)

Instructions:

1. Preheat the Hot Glue Gun.

2. Cover the edges of the frame.
Measure the inner and outer lengths and cut off the paper twine according to your measurements. You should end up with 8 strings, 4 for inside and 4 for the outside edges. Now untwist the twine just a little bit. It's easier to work with if it's less stiff.

3. Place a small dab of hot glue into one inner corner and attach the end of the first string. Let the glue cool off to make sure that the string stays in place, then draw a fine line of hot glue along the edges and attach the string bit by bit. Repeat three times to cover all four edges.


If you wonder why i have some flowers attached already, well that's because i realized i need to cover the edges after i glued on a row of flowers. Stupid me...

4. This step is actually the same like the third step but you have to cover the outer edges now. It's quite complicated to hold the mirror, the glue gun and then glue on the twine at the same time, so it might make sense to ask someone to help you. ( I asked my hubby to hold the mirror.)


In the end it should look like this:


5. Cut the crepe paper into strips, each should be about 2-4cm ( 1 or 2").
I cut some wider strips for the large flowers, moreover i cut some in half to make small filler flowers. You don't have to measure exactly or cut precisely straight lines as the size of the flower actually does not depend on the size of the strip but on how tight you roll it. See my messy strips:


6. Making flowers.
To make a flower take one strip into your left hand, crumple one end and roll it 2-3 times to create a shape similar to a ball. This is the base of the flower. Then put a small dab of hot glue onto the bottom side of the base, let it cool off and then twist the rest of the strip around the base while rolling the flower in your hand. Apply glue every once in a while (after two or three twists) and finally onto the end of the strip to secure the flower.


You can create different looks with this technique. Spinning the longer end of the strip around itself while twisting it around the base will make your flower look like a rose, whereas twisting it in a straight line will create a shape that resembles a ranunculus.

7.  Attach flowers.
Put a good amount of hot glue on one of the frame's corners and press the flower into the glue. Subsequently add flowers of different sizes. Fill small gaps with small flowers. Leave ca. 30cm of one side of the frame uncovered and have a few flowers left over.


8. Now cover up the free space with the paper twine, this is similar to step 2 and 3.
Measure the gap and cut off three strings of twine in a matching length and untwist it. First apply the hot glue, then attach the strings to cover the frame. Attach more strings if the wood keeps shimmering through.
Glue on the left over flowers to cover the starting points of the strings.


9. Draw a word or single letters on the cardboard and cut out the letters. We are newlyweds hence i chose the word  "Love" :)

Pull off parts of the cardboard's top layers on both sides of the letters until some of the grooves underneath become visible.
You can use any kind of cardboard but i prefer to process old stuff that otherwise would be thrown away, that's why i used a piece of thick cardboard from a packaging box.


10. Lastly paint the letters.  (You could also cover them with pretty scrapbooking paper or fabric scraps)
Apply just a small portion of paint and brush vertically towards the grooves to paint only parts of the cardboard. I used white acrylic paint and a tiny amount of red and golden glitter.
Brush parallel and paint the grooves if you want to cover the letter completely.


Once the paint is dry carefully apply some hot glue and glue the letters on to the mirror frame.


And that's it!


You probably have to clean the mirror afterwards, wipe off dirt and fingerprints from the mirror face and remove those nasty filaments caused by the hot glue.

I plan to embellish the centre of the flowers with pearls or some sparkly stuff but so far i am extremely happy with how the mirror turned out!


P.S. A more detailed description of how to make crepe paper roses can be found at "Homespun with Love"