Showing posts with label Canvas. Show all posts
Photo Canvas
One of MisterT's co-workers was lucky enough to celebrate his retirement last week. He threw a big party, and what could be a better gift than a distressed photo canvas?
DIY: Washi Tape Canvas
This DIY was so fast that it is almost ridiculous to call it a 'project', let alone write a tutorial.
I made it early in the morning before i went to work. Simply grabbed a blank canvas and put on the tape.
Super-duper quick and easy!
I made it early in the morning before i went to work. Simply grabbed a blank canvas and put on the tape.
Super-duper quick and easy!
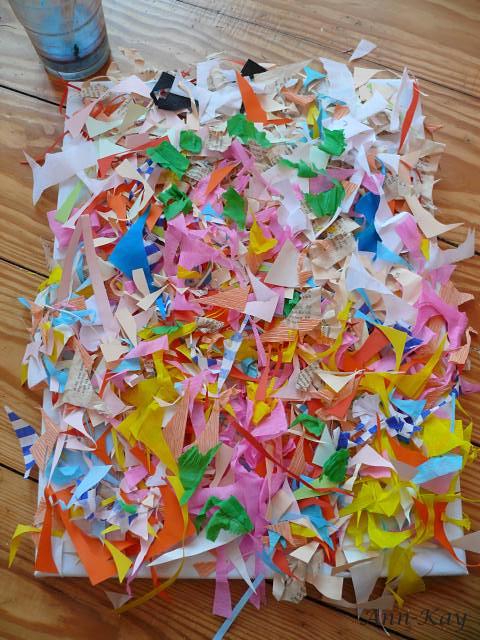
DIY: Paper Scrap Canvas Part I
Everyone who crafts with paper and fabric frequently knows this problem: What to do with all those scraps that are left over after cutting the paper/ fabric?
On the one hand you want to throw them away, but on the other hand they are too pretty and some of the paper/ fabric once cost a fortune.
My initial solution: Keep them in an empty shoe box.
Then wait for that special day of the year when your are getting so sick and tired of keeping every single bit of junk in empty shoe boxes. Now grab those scraps, a canvas, lots of Mod Podge, some water and a large paint brush or sponge, and create a fun and colorful unique piece of art.
1. Mix Mod Podge with some water ( my mixture is blue from a previous scrapbook project)
2. Generously apply that mixture to the canvas
3. Cover the canvas with your paper/ fabric scraps. Again, be genereous. You want to get rid of all of them ( because you need the shoe box to store other
4. Apply more of the Mod Podge-water mixture until the entire canvas ( and every single scrap) is covered. Drown the scraps by carefully dabbing and pressing them down with a sponge.
5. Let dry for a couple of days.
And that's it!
Stay tuned for Part II, where i am going to show you how i used some spray paint and acrylic paint and turned this canvas into a pretty beach-inspired painting.
DIY: Dried Flower Canvas #2 - Tulips
Here's another tutorial about how to turn a dried flower bouquet into an individual piece of artwork.
Materials:
- dried tulip bouquet
- paint brush and sponge
- acrylic paint in turquoise, yellow, red and green
- Mod Podge ( or similar)
- large sheet of paper matching the size of the bouquet ( or a canvas)
The best way to dry tulips is to just let them sit in the vase until the blossoms are completely dry. Pay attention to the water though and pour away when it turns dull, otherwise it might mold.
1. To create a contrasting background, mix blue acrylic paint with a drob of water, dunk in a paintbrush and splash the paint onto the paper/ canvas. No need to be precise, just feel and act like a five-year-old again, whee!
2. Let dry, then use a sponge to cover the entire surface with Mod Podge.
3. Now carefully place the bouquet on top of the paper and immediately press it down with a flat and solid item. Smart people use a book, unprepared dummies grab the next best thing they can find ( e.g. a paint brush package).
Make sure all the petals get in contact with the Mod Podge
4. Up next, dab the flowers with Mod Podge. It is important that all the petals keep sticking to the paper/ canvas, otherwise they will fall down once you hang your piece of artwork.
Let dry completely for ca. 1-3 hours. In the meantime, wash your sponge and paintbrush.
4. Now you can paint the flowers.
Mix different hues to achieve a vivid and more realistic look. In addition to yellow i applied a red color to make my flowers look like parrot tulips.
For the stems, start with a dark green and put some highlights with a brighter shade.
5. Again, let the paint dry completely.
6. As a final step, insert the sheet of paper into a glassless frame and hang it up.
This project is linked up to my favorite Linky Parties
Materials:
- dried tulip bouquet
- paint brush and sponge
- acrylic paint in turquoise, yellow, red and green
- Mod Podge ( or similar)
- large sheet of paper matching the size of the bouquet ( or a canvas)
The best way to dry tulips is to just let them sit in the vase until the blossoms are completely dry. Pay attention to the water though and pour away when it turns dull, otherwise it might mold.
1. To create a contrasting background, mix blue acrylic paint with a drob of water, dunk in a paintbrush and splash the paint onto the paper/ canvas. No need to be precise, just feel and act like a five-year-old again, whee!
2. Let dry, then use a sponge to cover the entire surface with Mod Podge.
3. Now carefully place the bouquet on top of the paper and immediately press it down with a flat and solid item. Smart people use a book, unprepared dummies grab the next best thing they can find ( e.g. a paint brush package).
Make sure all the petals get in contact with the Mod Podge
4. Up next, dab the flowers with Mod Podge. It is important that all the petals keep sticking to the paper/ canvas, otherwise they will fall down once you hang your piece of artwork.
Let dry completely for ca. 1-3 hours. In the meantime, wash your sponge and paintbrush.
4. Now you can paint the flowers.
Mix different hues to achieve a vivid and more realistic look. In addition to yellow i applied a red color to make my flowers look like parrot tulips.
For the stems, start with a dark green and put some highlights with a brighter shade.
5. Again, let the paint dry completely.
6. As a final step, insert the sheet of paper into a glassless frame and hang it up.
And that's it!
This project is linked up to my favorite Linky Parties
DIY: Dried Flower Canvas
Today i will be decking the halls, create our advent wreath, make some DIY christmas decoration and listen to christmas music all day long. So this is probably my last non-christmas project for this year:
Dried and painted flowers on a canvas.
It is made from the bouquet that MisterT gave me on our six months anniversary. To avoid confusion:
This tutorial was orginally written for my Wedding Blog, but i am thinking about shutting down that blog and simply copied the entire text. So, here it is:
I'm ultra excited to finally be able to share a project that i started several weeks ago. This a tutorial on how to turn your bridal bouquet into your own unique piece of art.
Many companies offer numerous kinds of flower preservation; i think the most common keepsakes are freeze dried and pressed bouquets in a pretty frame or shadowbox, floral candles or my personal favorite and inspiration: a canvas, like these darling creations by Curly Art and Flowers Into Paintings.
This painting is not intended to copy a professional's amazing work ( obviously), but hopefully a helpful suggestion for brides on a budget who want to create their own keepsakes.
It is meant to inspire you, encourage your creativity and to show you what you can make with parts of your bouquet instead of throwing it away.
I threw mine away because we had a destination wedding, hence enough wedding items that filled up our luggage space. It included nothing but white roses and honestly, i can easily buy those flowers here anytime and would not even notice the difference.
But i wanted to keep the pretty bouquet that my husband gave me on our 6 months anniversary as i felt more emotionally attached to it than to my wedding flowers.
So for this tutorial let's just pretend this is my bridal boquet:
A few more words beforehand:
- Your flowers will not look like they used to while being fresh.
- This method does not actually preserve the flowers and keep them from wilting. It is not comparable to a professional preservation but a simple homemade drying method
- It probably does not work for large and solid flowers like succulents
- Roses, Dahlias, Callas and Carnations can better be dried "normally". They might shrink but do not lose too much of their actual shape
- Start drying the flowers before they start to wilt
- You might want to pratice with some less meaningful flowers before the big day to get a feeling for the technique and find out if this DIY option is the right choice for you.
Materials:
Part 1:
- Flower Bouquet
- 1 large heavy book, and a few more heavy books and photo albums
- Scissors
- 1 sheet of Transparency Film with a removable paper-back, like the one that teachers use on overhead projectors. Use 2 or more sheets for a larger canvas
Part 2:
- your dried flowers
- A canvas, about the same size as the transparency foil
- Mod Podge
I make my own Mod Podge ( see the instructions on Do It Yourself Divas)
However, i recently read that the DIY equivalent can start to yellow after a few years hence it might make sense to buy the real Mod Podge for this project.
Part 3:
- Paint & Paintbrushes
- Clear Sealant
Instructions:
Part 1:
Open a page in the last third of your large heavy book, place the sheet of transparency film on it and lift up the foil.
Cut off the stem as close to the blossom as possible and arrange all blooms on the sheet of paper. Some flowers will fall apart but you can still use the single petals.
Then flap down the foil and push it down with one hand while you close the book. ( I asked my husband to help me to make sure the flowers would not get out of place)
Put your book into a safe place, add extra weight with additional books and photo albums, and leave it alone for at least one week. Two weeks are even better to make sure the flowers are well dried.
Part 2:
- Cover the canvas with a mighty thick layer of Mod Podge
- Place your flower sheet onto the canvas, carefully and accurately. You have only one try as the paper will stick immediately.
- Press down the foil with one hand while your other hand holds the bottom side of the canvas to create a back-pressure. It is important that the paper soaks up as much glue as possible, therefore press until the entire paper is pretty damp to make sure it keeps sticking. The stickiness is the base of this creation. Use your finger to smoothen the wet paper if you mind the bumps and wrinkles ( i didn't)
- Lift up the foil slowly but do not tear it off yet, just put it aside. Gently pull off any sticky petals and place them into their final postion. Intact flowers can carefully be pushed with a finger, as well as any small crumbs.
- Now you can start covering the flowers with Mod Podge. They are quite liquid-repellent, so do not hesitate to "drown" them in glue.
I used two different techniques: at first i held the single petals with one finger, dipped the paintbrush into the glue and applied it as if i would paint the petals.
The Gerbera Daisies were still intact and i could easily lift them up and apply some glue on their bottom, put them back onto the canvas and drip a fairly large blob on the bloom. Then i dabbed the daisies carefully until they were fully covered with glue.
In the end i dabbed the entire canvas with more glue:
Now you can tear off the transparency film and let the canvas dry thoroughly. I waited three days before i proceeded, just to be on the safe side.
Once everything is dry and save you can trim the paper with scissors or a x-acto knife. I left a margin and glued it to the sides of the canvas with normal glue.
Part 3:
Be creative!
I worked with water paint, oil paint, acrylic paint, glitter and scrapbooking stickers. Moreover i added the Calla Lilly that i had dried seperately.
You can also add rhinestones, doilies, scrapbooking paper, stencils, lace, photos, construct a frame from border stickers,... . Use anything that comes to your mind!
I simply mixed my paint in a color range that would partly match the former bouquet and started covering the flowers and background without having an actual plan. Once i was happy with the result i let the canvas dry for one more day and finally sealed my artwork with a coat of matte Crystal Clear Spray.
You will get different effects by using a variety of paintbrushes and mixing colors of different consistency, e.g. use a soft brush to apply "thin" watery color, and a dry painbrush and solid paint to create highlights.
See this pin and learn how to create different watercolor textures with household items.
Lastly, a few more ( not so appetizing photos) that i took while painting and arranging.
And again the final result:
Dried and painted flowers on a canvas.
It is made from the bouquet that MisterT gave me on our six months anniversary. To avoid confusion:
This tutorial was orginally written for my Wedding Blog, but i am thinking about shutting down that blog and simply copied the entire text. So, here it is:
I'm ultra excited to finally be able to share a project that i started several weeks ago. This a tutorial on how to turn your bridal bouquet into your own unique piece of art.
Many companies offer numerous kinds of flower preservation; i think the most common keepsakes are freeze dried and pressed bouquets in a pretty frame or shadowbox, floral candles or my personal favorite and inspiration: a canvas, like these darling creations by Curly Art and Flowers Into Paintings.
This painting is not intended to copy a professional's amazing work ( obviously), but hopefully a helpful suggestion for brides on a budget who want to create their own keepsakes.
It is meant to inspire you, encourage your creativity and to show you what you can make with parts of your bouquet instead of throwing it away.
I threw mine away because we had a destination wedding, hence enough wedding items that filled up our luggage space. It included nothing but white roses and honestly, i can easily buy those flowers here anytime and would not even notice the difference.
But i wanted to keep the pretty bouquet that my husband gave me on our 6 months anniversary as i felt more emotionally attached to it than to my wedding flowers.
So for this tutorial let's just pretend this is my bridal boquet:
A few more words beforehand:
- Your flowers will not look like they used to while being fresh.
- This method does not actually preserve the flowers and keep them from wilting. It is not comparable to a professional preservation but a simple homemade drying method
- It probably does not work for large and solid flowers like succulents
- Roses, Dahlias, Callas and Carnations can better be dried "normally". They might shrink but do not lose too much of their actual shape
- Start drying the flowers before they start to wilt
- You might want to pratice with some less meaningful flowers before the big day to get a feeling for the technique and find out if this DIY option is the right choice for you.
Materials:
Part 1:
- Flower Bouquet
- 1 large heavy book, and a few more heavy books and photo albums
- Scissors
- 1 sheet of Transparency Film with a removable paper-back, like the one that teachers use on overhead projectors. Use 2 or more sheets for a larger canvas
Part 2:
- your dried flowers
- A canvas, about the same size as the transparency foil
- Mod Podge
I make my own Mod Podge ( see the instructions on Do It Yourself Divas)
However, i recently read that the DIY equivalent can start to yellow after a few years hence it might make sense to buy the real Mod Podge for this project.
Part 3:
- Paint & Paintbrushes
- Clear Sealant
Instructions:
Part 1:
Open a page in the last third of your large heavy book, place the sheet of transparency film on it and lift up the foil.
Cut off the stem as close to the blossom as possible and arrange all blooms on the sheet of paper. Some flowers will fall apart but you can still use the single petals.
Then flap down the foil and push it down with one hand while you close the book. ( I asked my husband to help me to make sure the flowers would not get out of place)
Put your book into a safe place, add extra weight with additional books and photo albums, and leave it alone for at least one week. Two weeks are even better to make sure the flowers are well dried.
Part 2:
- Cover the canvas with a mighty thick layer of Mod Podge
- Place your flower sheet onto the canvas, carefully and accurately. You have only one try as the paper will stick immediately.
- Press down the foil with one hand while your other hand holds the bottom side of the canvas to create a back-pressure. It is important that the paper soaks up as much glue as possible, therefore press until the entire paper is pretty damp to make sure it keeps sticking. The stickiness is the base of this creation. Use your finger to smoothen the wet paper if you mind the bumps and wrinkles ( i didn't)
- Lift up the foil slowly but do not tear it off yet, just put it aside. Gently pull off any sticky petals and place them into their final postion. Intact flowers can carefully be pushed with a finger, as well as any small crumbs.
- Now you can start covering the flowers with Mod Podge. They are quite liquid-repellent, so do not hesitate to "drown" them in glue.
I used two different techniques: at first i held the single petals with one finger, dipped the paintbrush into the glue and applied it as if i would paint the petals.
The Gerbera Daisies were still intact and i could easily lift them up and apply some glue on their bottom, put them back onto the canvas and drip a fairly large blob on the bloom. Then i dabbed the daisies carefully until they were fully covered with glue.
In the end i dabbed the entire canvas with more glue:
Now you can tear off the transparency film and let the canvas dry thoroughly. I waited three days before i proceeded, just to be on the safe side.
Once everything is dry and save you can trim the paper with scissors or a x-acto knife. I left a margin and glued it to the sides of the canvas with normal glue.
Part 3:
Be creative!
I worked with water paint, oil paint, acrylic paint, glitter and scrapbooking stickers. Moreover i added the Calla Lilly that i had dried seperately.
You can also add rhinestones, doilies, scrapbooking paper, stencils, lace, photos, construct a frame from border stickers,... . Use anything that comes to your mind!
I simply mixed my paint in a color range that would partly match the former bouquet and started covering the flowers and background without having an actual plan. Once i was happy with the result i let the canvas dry for one more day and finally sealed my artwork with a coat of matte Crystal Clear Spray.
You will get different effects by using a variety of paintbrushes and mixing colors of different consistency, e.g. use a soft brush to apply "thin" watery color, and a dry painbrush and solid paint to create highlights.
See this pin and learn how to create different watercolor textures with household items.
Lastly, a few more ( not so appetizing photos) that i took while painting and arranging.
And again the final result:
Subscribe to:
Posts (Atom)