Advent Calender #9 - Paper Luminary


This luminary bag is at least 7 years old and terribly wrinkly but i love it and could never throw it away. It was made by the neighbours' boys in our first appartment back in our hometown.
They often made little things for everyone in the building and put it in front of each apartment door. It was nice to get out in the morning or come home in the evening and find their pretty gifts.

Advent Calendar #8 - No-Photoshop Silhouette Tutorial

Silhouette images are a cute huge trend and they make perfect gifts for christmas, other special occasions or as home decor. I have seen numerous tutorials on how to create them in Photoshop but i don't have Photoshop so i had to figure out another way.

In this tutorial i am going to explain how to create a silhouette using Picasa Photo Viewer and Microsoft Paint.
Picasa is free and can be downloaded here.
Paint is included in any Microsoft Operating System ( i do not know if Apple has a similar software included)


To make the silhouette ornaments above i edited two of our wedding photos, which i don't want to share here. I am going to use a photo of my saltdough starfish instead to show you the single steps, but the technique is indeed the same, no matter if you edit a face or a random item.

The tutorial might seem complicated at first but it is actually pretty easy and takes only a few minutes once you know what to do.

Instructions:

1. Always make a copy of the photo first! Never edit the original picture!

I once made the mistake of saving some unwanted changes to the original file accidentially but did not notice it right away. There was no way to undo the changes later on and the file was damaged forever.
Since then i always create a new folder where i can save the copied picture and transform it without any fear.

So, choose a picture, copy it into a new folder, rename it to avoid any confusion with the original file and open the new file in Picasa.
Click the "crop" button.


2. Select "manual" from the menu and crop the area around the person's head ( please envision the starfish as the head). Next click "Apply".


Picasa also has a "straighten" feature to trim a crooked photo. Please note: You must crop a larger section if you want to use that feature, because it actually zooms in.
Ugh, it's difficult to explain. So, this is what my image would look like after straightening it. See how it crops of my starfish's arms?


I would have to crop a larger section if i wanted to straighten the image.
But don't worry, you can crop and recrop and undo and fix every change any time as long as you do not save the file.


3. Once you're happy with the image section, save the cropped picture and open it in Paint.

I appologize for not being able to change the language settings in Paint, but i hope you can follow the steps anyhow.

Use the "free-form selection", left click at a starting point and draw your way around the head's shape without releasing the mouse button.


Once you are finished release the mouse button and click "crop" at the top of the page ( or right-click into the marked area and select crop).


 The image should have a white background now and look somehow like this:


As you can see i did not work too precisely but it doesn't matter so far.

Save the photo.


4. Now leave Paint and open the cropped image in Picasa again. Select "Effects" and turn the picture into black and white using the "B&W" button.


5. Switch to the "Tuning" section and increase the shadows by dragging the level rightwards.


The image is still not dark enough, so you have to repeat this step. To do so, simply click into the "Effects" section then switch back to "Tuning" immediately. As you can see this little trick allows you to drag the level again.


Repeat a few times until your image has a deep black saturation, then save it.


 Instead of the "save" function i use "save as" now to get an extra copy, just to be on the safe side.


6. You can clearly see the result of my previous sloppiness. I need to go back to Paint and use the eraser tool and correct those imperfections to sharpen the edges.


Looks good enough and i can save the image just the way it is now.


And that's it!

This is the exact same technique i used to create the silhouettes of MisterT and me.


Now you can print your silhouette image and transfer it to canvas, cardboard, porcelain, clay or paper and create wonderful christmas gifts, ornaments, tags, greetings cards, dinner plates, coffee mugs or anything that comes to your mind.


This tutorial is linked up to my favorite Linky Parties and the CSI Project's Handmade Ornament Challenge


Visit thecsiproject.com

Advent Calendar #7 - Stars


The wall decals were on sale at TK Maxx and the golden stars on sticks are at least ten years old; i made them from cardboard and golden spray paint. The bamboo sticks used to be golden as well but the paint has faded in the course of time.
The white star is a paper doily and another one of those quick projects that i create in the evening while sitting on the sofa and watching my favorite TV shows.

Advent Calendar #6 - Nikolaus

What do you think, has MisterT been naughty or nice? Did he get the birch or has Nikolaus filled his ( not so shiny) boot?

A short explanation to those of you who are not familiar with the Nikolaus tradition:

Nikolaus von Myra, a bishop and priest who lived sometime around 300, was said to have come into a fortune after the death of his parents and being a generous and kind person who donated to the poor. With Luther rejecting the veneration of saints in the 16th century, the day of gift giving has changed from the 6th of december ( in honor of Nikolaus) to the end of december, Christmas. Since then people wait for the "Christkind" on Christmas Eve respectively the "Weihnachtsmann" ( Santa Clause) to bring presents, depending on their religion and the part of the country they live in.
Despite Christmas being the big event we still celebrate Nikolaus on December 6th as an additional day of giving gifts, mainly to the children, however it is not a legal holiday. The kids clean a boot or shoe the night before and put them outside in front of the door. If the child has been good all year, Nikolaus and Knecht Ruprecht ( his assistant and companion ) will fill the boot with apples, oranges, nuts, sweets and most often a little gift, whereas naughty kids will get nothing but a birch ( bunch of twigs) or coal.

That's it in a nutshell. The long version is much more complicated and the legends vary by region and religion.
Now let's take a look at MisterT's boot this morning.


It's filled!
Of course Nikolaus knows that my husband is always good and the saint generously ignored the fact that he did not clean his boot this year.
Lucky you, MisterT!

Oh, and i forgot to mention that Nikolaus was also known to be a huge fan of Martha Stewart and her recipes and so he brings homemade cookies in addition to the other treats.

Advent Calendar #4 - 2. Advent & Happy Sunday


Here's what happened this week:

1. I made my very first sale in my Etsy Shop yesterday!!! A cake topper garland will travel all the way to Los Angeles, how exciting!

2. I am on a roll again and won another great giveaway: Martha Stewart craft supplies at Momendeavors. It must seen as if i enter every stupid giveaway i can find, but i swear that i only sign up for those items that i really like and would love to win.

3. And i won the lottery. 3 out of 6, that makes about 7€, maybe 10€, depending on the odds.

4. I baked christmas cookies or at least i tried. The electric whisk broke while twirling the dough, the frosting was runny and the kitchen looked like a catastrophe afterwards. The cookies looked weird too but tasted ok. It's funny because my mother made cookies the same day and hers were a fail as well. She told me her ( green) frosting was runny too because she made a mistake while adding water and her kitchen looked "as if a green bear had stepped through the entire room". I try to envision that but all i can see is my father dressed up in a green bear costume, tramping and leaving a mess in their kitchen...

5. I actually got an invitation to a job interview at the publishing company i mentioned last week. This opportunity would change our life completely. The interview is tomorrow and i think i have never ever in my life been that nervous!

6. Another record on my blog: 1247 pageviews on Wednesday and more than 5300 within the last 7 days!

7. It is impossible to get a chocolate advent calendar at the end of November, let alone in December. Note to myself: Next year, be the first person to plunder the stores when they start stocking up on christmas treats! In August...


Happy 2. Advent!

Advent Calender #3 - No-Sew Denim Stocking Tutorial


This stocking is made from an old pair of Jeans from the Flea Market. I do not have a sewing machine so i had to use my dear hot glue gun instead. The "pocket" is a decoupaged paper napkin.


Total time: 15 minutes

Total Costs: 1,05€

Materials:

- Jeans ( 1€)
- Pencil + Scissors
- Napkin ( 99 cents for a pack of 20, that makes less than 5 cents per napkin)
- Decoupage ( or Mod Podge) + soft paintbrush
- Red Marker

Instructions:

1. Draw the shape of a stocking onto one "leg" and cut out both layers of fabric at the same time. I drew mine by eye but you can find a template here at Martha Stewart.

2. Apply hot glue all along the inside edges of both layers, stick them together and leave to cool.


3. Cut out a strip of fabric, fold it in half and adhere both ends to the back of the stocking to create a hook.


4. Cut the napkin into the shape of a back pocket, remove the top layer and place it on the stocking. Use a soft paintbrush and apply the Decoupage carefully, then let it dry.


5. ( optional)
I did not like the yellow seams, so i painted them red with a permant marker. Moreover i used the marker to imitate stitches along the edges.


And that's it!


This project is linked up to my favorite Linky Parties

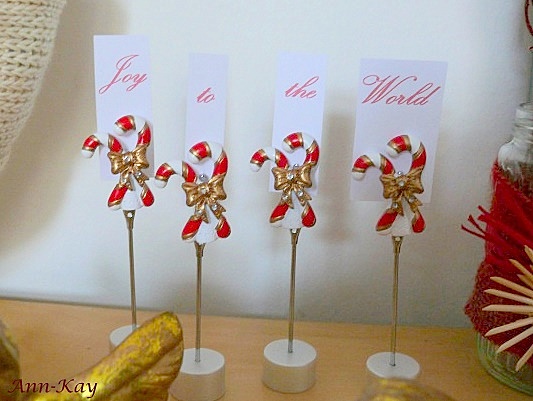
Advent Calender #2 - Joy to the World

I ordered some wedding items from the UK last year and since i had to pay the shipping costs anyway i thought it might make sense to fill up the cart with a few more items from the shop's clearance section, like these cute Candy Cane Placecard Holders.

 
My parents will not visit us on Christmas this year, hence i am not going to use the holders for our dinner table and included them in our decoration instead.
I  created the words in Microsoft Word using "Kunstler Script" and printed them on regular printer paper.
So simple and pretty.

Advent Calender #1 - Cotton Wool Christmas Tree

I thought it would be fun to have an advent calender here on my blog, so for the next 24 days i am going to publish a photo of one of my christmas items each day. If there is anything interesting to say i will add a little description or a tutorial, otherwise it will be just a wordless picture.

Let's start with this DIY Cotton Wool Christmas Tree; a spontaneous project while sitting on the sofa and watching TV in the evening.


It is made from a piece of used cardboard that i turned into a cone shape. I secured it with lots of sticky tape, applied glue all over the cone and wrapped around strips of cotton wool, a golden ribbon and a wire embellished with red stars.
Lastly, i glued on a couple of golden stars and put a straw ornament on top of the tree.

That's it. Quick and easy.


This project is linked up to my favorite Linky Parties