Prepare your working space. You need:
- air dry modelling paste or clay
- a solid non sticky base
- a rolling pin ( i don't have one, i use a tumbler instead)
- a ceramic bowl, or a large teacup or mug
- buttons in different sizes and colors
 |
| personal photo |
1. Grab a portion of the modelling paste and form a ball by rolling it between your palms.
 |
| personal photo |
2. Lay the ball onto your base, press it down and roll it flat with the rolling pin. You need twice the height of the buttons, otherwise the ring dish might crack.
 |
| personal photo |
3. Use a bowl to cut out the shape. If you don't want a round shape use a cookie cutter or a square vase or anything you like. You can cut out the desired shape by hand as well; i often use a small potatoe knife to do so.
 |
| personal photo |
4. ( Skip this step if you don't want to attach ribbons)
Cut off two ribbons or twine, each about 8" (20cm ). Choose the color carefully as you can not replace the ribbon once the paste is dry. You can remove it though.
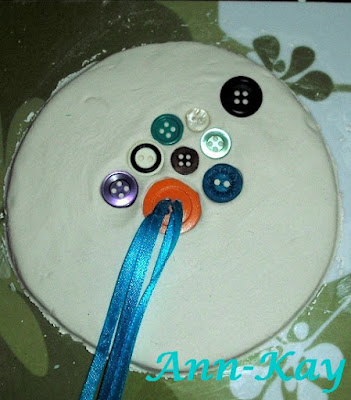
Select a large button that has four holes and thread each ribbon through two holes.
 |
| personal photo |
5. Push the button into the middle of the clay circle, next up add the rest of your buttons. Make sure to press them deeply enough. Their surface should be even with the clay's surface.
 |
| personal photo |
 |
| personal photo |
6. Now lift up the circle from your base very CAREFULLY. If it keeps sticking onto the surface use a small knife to raise it.
7. Gently place the circle into the ceramic bowl ( or any other mold). Now let it dry.
 |
| personal photo |
8. Clean up your working space and base. Small crumbs dry fast and it's easier to remove them immediately. You don't want to risk ruining your countertop or table.
9. Let the modelling paste dry at least 24 hours. You can intensify the drying process by placing the bowl into direct sunlight- but still, it needs at least one full day to dry through completely, depending on the thickness and the room temperature it might even take 2 or 3 days.
Do not touch it while it is still soft. I know you can't resist but let me assure you: it t won't be dry after 5 hours, not after 10 hours and not after 15 hours. DO.NOT.TOUCH!! ( I'm mainly adressing myself right now...)
10. Once the paste is dry it should slip out of the mold easily. If it doesn't try to unfix it by sticking a needle between the clay and the ceramic bowl. Again, do it carefully.
If it keeps being stuck means that it is not dry yet. If you can bend it then it's not dry either.
 |
| personal photo |
11. Gently polish the edges with fine sandpaper until they look smooth. I usually start with 180 but then change to 600 grade grit-paper. You can also use the fine sand paper to fix small imperfections and minor cracks on the ring bowl's surface.
The refining process takes anything between a few minutes or several hours, it actually depends on the thickness of the bowl, but more so on your accuracy during the building process.
12. Damp a tissue, Q-Tip or a small paintbrush and wipe off the dust from the buttons.
And that's it!
 |
| personal photo |
P.S: I listed this button bowl in my Etsy Shop, so if you are too lazy to make one yourself you can buy it there :)
Just contact me here or via Etsy if you don't see the listing.
http://www.etsy.com/listing/81396403/ring-bearer-bowl-with-buttons-ringschale
