

Welcome to Part 2 of putz house making. Whew, what an adventure!
Yesterday, i played contractor and built the houses ( click here for Part 1), and today i want to show you how to make some cute details to decorate the houses. My inital plan was to decorate both villages, Christmas and Halloween, and for each house i have a story in mind of who lives there and whatnot.
But man! Making the christmas details took forever, and I'm extremely exhausted. So for now, i'll just leave the Halloween houses the way they are.
However, decorating is fun! Making mini doors, and window frames and shutters and wreaths and bows is fun! Adding snow and glitter is fun, of course!
Again, a photo of the plain houses before:

And after:

WARNING: This blog post is extremely long with tons of photos, hence I have to truncate the post here.
My apologies to everyone who reads this via Feedly ( or any other feed reader).
Ok, now let's start!
Let's make wreaths:

Materials:
- 1"circle punch
- 5/8" circle punch
- green and red cardstock
- scissors
- pencil
- Mod Podge
- paint brush
- hot glue
1. Punch a circle from green cardstock with the 1" punch. My circle looks a bit crooked because the punch is old and dull.

2. Slot the circle into the 5/8 punch.

3. Hold the punch against the light so that you can see if the circle is centered.

4. Punch. The result is a ring, which serves as the base for the wreath.

5. Cut small strips ( 3-4 mm wide) from green cardstock, then cut the strips into tiny pieces.
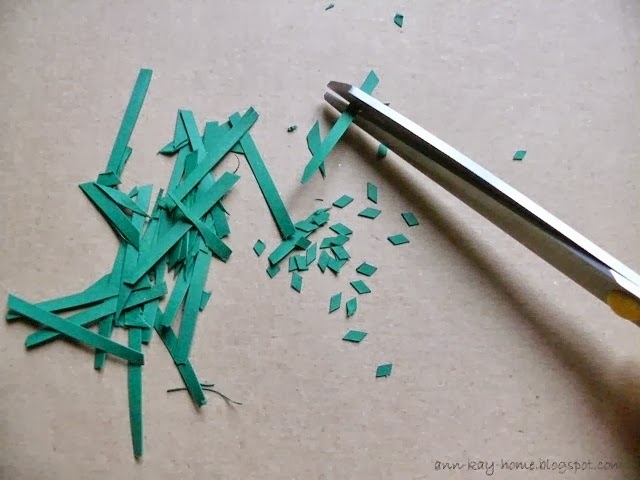
6. Apply Mod Podge to the ring, then sprinkle the tiny pieces all over.


7. Let dry for a few minutes, then apply more Mod Podge, sprinkle again and let dry for at least one hour.

8. In the meantime, make the bows.
The easiest and fastest way to make bows is by simply sketching them on plain red cardstock, and cut them out with scissors.


No need to cut super-precisely, and no need to worry about how to remove the pencil markings. Once cut, simply turn the bows around, et voilà. the markings are gone :)

9. Attach the bows with a small dab of hot glue.


10. ( optional) In order to achieve a dimensional look, cover the bows with a pearl pen, and let dry.

Now let's make a fir tree:

Materials:
-green carstock
-toothpick
-scissors
-hot glue
1. Cut a variety of different sized squares from cardstock
2. With the tip of the scissors, poke a little hole into the center of each square

3. Take the toothpick and prong the squares like schashlik. Start with the largest pieces and end with the smallest, just like a pyramid. If necessary, cut off the excess part of the toothpick.

4. Now the tree needs a tree stand. I used a round chipboard piece that was included in Ikea's Christmas Paper Kit last year, but you may as well use cardboard instead, or a a little piece of styrofoam or anything that can hold the tree.
Simply snip off the pointed tip of the toothpick, drill a little hole to the center of the chipboard, add a dab of hot glue, and plug in the toothpick.

5. Lastly, decorate the treetop. I used a tiny golden confetti star.

Let's make a rosette tree:

Materials:
- patterned paper
- toothpick
- scissors
- hot glue
1. Cut the paper into different sized strips. The largest strip should be no wider than 1.5 cm, the smallest is roughly 5 mm.

2. Start with the widest strip. Accordion-fold the paper, then glue both ends together.


3. Press down the center and add a little hot glue. Let it cool shortly, and while the glue is still warm, plug in the toothpick. Hold until the glue has cooled.
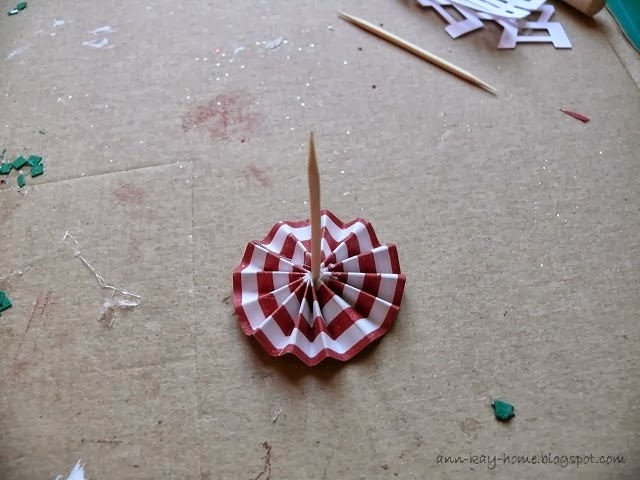
Here's a little trick: Simply cut little paper squares and place them underneath the rosette. This will prevent the paper from getting glued to your work surface.


4. Repeat steps 1-3 with the remaining strips.


5. Decorate the top of the tree. Since this is the Shop's tree, I used a cute little price tag from the Tim Holtz Merriment Paper Stack.


But i think it would be cute to add another tiny rosette, vertically.
Now let's make the sleigh and gifts:

Materials:
- red cardstock
- plain white paper
- red and white Baker's Twine
- wash tape
- cotton wool
- cardboard
- hot glue
- scissors
The inspiration: http://www.pinterest.com/pin/236298311670230595/
The sleigh is one of the few shapes i cut with my Cameo. You can download it here.
If you don't have a cutting machine, you can find tons of beautiful template via Google search.
1. Cut the sleigh from red cardstock and glue the pieces together


2. Fake a sheep skin by lining the sleigh with cotton wool.

3. Cut little squares and rectangles from cardboard.

4. Glue together 4 pieces each of the same size with hot glue


5. Cut pieces from white paper and wrap the cardboard stacks like you would wrap real gifts.


6 . Decorate your gifts. Wrap them with Washi Wape and Baker's Twine


Let's make store signs:


Materials:
- red cardstock
- a tiny piece of brown cardstock
- white and gold glitter
- Washi Tape
- Mod Podge
- paint brush
- red acrylic paint
- hot glue
The inital inspiration, before i decided to turn the house into a store: http://www.pinterest.com/pin/236298311670733148/
Crane's Canes Store Banner:
1. Again the store banner is designed and cut with my Cameo. I can't find the banner i used online; it's probably one the shapes that were included in the Silhouette Studio software. My handwriting is lousy, but thankfully i own the Silhouette sketch pens.
So, you can either use a shape from the Silhouette Online Store, draw a banner free-hand, or search Google again.
Once cut, apply Mod Podge to the upper edge of the banner, and cover it with white and gold glitter.

2. Let dry for a moment, then use a paint brush to trace the words with Mod Podge, and again, cover with glitter.


3. Set aside to dry, and later on remove the excess glitter by gently brushing it off with a dry and soft (!) paint brush.
( Tip: I absolutely LOVE the Martha Stewart brushes for delicate projects like these, because their nylon bristles are soft like silk )

4. Deorate the building with a strip of red and white washi tape.

5. Add puffy stickers to the backside of the banner and stick it to the front of the the building


6. Now grab your acrylic paint and the little piece of brown cardstock, and paint it with the words "OPEN".

5. Let dry, then add Mod Podge and glitter just like you did with the banner.


6. Let dry again ( ugh, see a pattern?), then glue the sign to the store's front door.
Let's add some random decoration to the Candy Cane store:

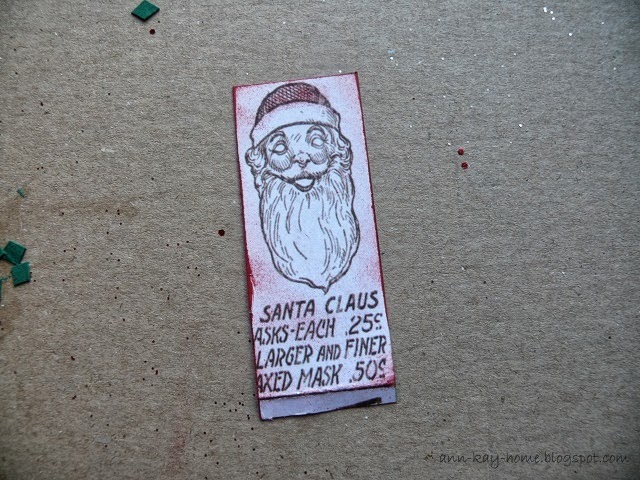
1. The window- what could i use to decorate the window? The tiny price tags that i on top of the pinwheel tree seemed perfect.

I looked at the tags, and then, well then i got
A few dabs of red ink to hide the paint , and dadaaaa! Our date :)


2. I used what i had on hand, and this golden pearl garland has been sitting in my clutter box for years! Perfect for the window as well!

3. The pillar. No idea how to make a candy cane, but a striped paper straw does the trick. Cut it, then glued it to the awning.


4. Another sign. Again, from the Tim Holtz Merriment papers. Cut it, distressed it and, and later on when i arranged my village i glued it to the house.


That's it for the store so far.
The church:

Materials:
- brown paper
- white corrugated cardstock
- brown ink pad
- scissors
- glue
The inspiration: http://www.pinterest.com/pin/236298311670124585/
1. Take a piece of brown paper and remove the lid from the ink pad

2. Carefully place the ink pad onto the paper and press it down very gently


3. Cut it out and glue it to the church.

4. Now cut a piece of corrugated white cardboard the same width as the door and glue it to the house, right above the door.


Ok, what else can we make? Oh yeah, lanterns.
Materials:
- cardboard
- white acrylic paint
- hot glue
- black fine marker
- black ink pad
1. Cut cardboard into 8 tiny squares of 5 mm each.

2. Glue the pieces together, just like you did with the gifts, then paint the stacks with white acrylic paint and set aside to dry.

3. Once the paint has dried, carfully distress the edges with black ink.

4. Use the black marker to draw an "X" all across the front.

5. Glue the lanterns to the left and right side of the church door.

The cottage:
The cottage is our house, the house that me and MisterT would live in ( umm, Crane's Canes is my store, too, by the way) . This beautiful, adorable, sweet little house:
 |
| This is the inspiration pin. Unfortunately, i can't find the original source. |

Just a few random snippets of how i decorated the house:
1. Paper lace trim for the roof ( Ikea)

2. A door made from patterned paper ( Glitz Happy Travels collection)


3. Curtains cut from a linen fabric sample


4. A stocking brad to add some holiday charm to the window

5. A chimney stuffed with cotton wool.

The glitter house:
Who would live in a sparkly ruby red glitter house? Dorothy, of course!
The glitter house is the former ugly sheet music house from an empty milk carton. What a transformation!


Frankly, i have absolutely no idea how to further decorate this house. I'll just leave it like this, no doors and windows. Sorry, Dorothy.
Lastly, the bench:
The bench was included in the Ledge house shape ( Crane's Canes, the store) by Marji Roy. Her designs are absolutely adorable, and i love how easy to assemble they are. The way the house is folded, it can even by used as a gift box!
Anyway, some love birds carved their initials into the bench. Vandalism!

Whew, that's it! All the decorations are done!!
Let it snow!
Materials:
- a large piece of cardboard ( or a wooden board, the lid of a shoe box, or anything else you want to use)
- fake snow
- cotton wool
- Mod Podge
- Paper Mod Podge
- a large paint brush
- hot glue

1. Cover your wok space with a large plastic sack, otherwise you will end up having snowflakes everywhere.
2. Apply Mod Podge, tons of Mod Podge to the cardboard


3. Cover it with tons of snow, then gently spread the snow with your hand

4. Carefully lift up the board, so that any excess snow can fall off

5. Apply hot glue to one corner, and quickly cover it with cotton wool. Carefully de-fluff the cotton if necessary.


6. Work your way all around, until the board is fully covered.

7. Now the houses need some snow, too.
Now, I switched to Paper Mod Podge instead of the regular formula, because i feel like the Paper Podge makes the paper less soggy. It might be wishful thinking though...
Anyway, carefully apply Paper Mod Podge to the roof of a house, then grab a handful of snow ( or two) and let it fall down onto the roof.


8. Repeat with every house, and don't forget to add snow to the details as well.
Cover the trees, the wreaths, the lanterns, the bench, and the signs. Cover every tiny corner where there might be snow in real life.


9. Set aside to dry for a little while, then carefully shake off the excess snow.

10. Once everything is dry, pour the remaining snow back into its packaging to be used for future projects.
11. Arrange your village.

Once you have figured out where to place the single houses, you may as well glue them to the board.
However I prefer not to, simply because storage after the holidays will be much easier.
And that's it!!! We're done! Here's our little Christmas Village!

I think my village is a mixture of Bedford Falls and Whoville. I should add another house: the good old "Building and Loan".
With "It's a wonderful Life" being one of my absolute favorite movies of all times, it was the original blog post at 320 Sycamore that made me fall in love with christmas villages two years ago. Oh, how i would love to own one of these buildings!
Anyway, a summary of my paper houses:


The fir tree

Crane's Canes Christmas Store


Dorothy's Glitter House

The church

The bench

The rosette tree

And the sleigh

And the village again:

One last photo just so can see the dimensions, in comparison to a chair:

