Sketch Challenge: Ocean Drive

The November Challenge of Scrap365 is based on a sketch by Tiff Firth:


And this is my interpretation:


For this layout i chose a photo of Miami's Ocean Drive, taken during our vacation in 2008.


When i think of South Beach, the colors turquoise, pink, green and yellow immediately come to my mind's eye, so i wanted to include those colors in my design. However, i used gold instead of yellow, 1. because yellow is a sunny daytime color and my photo was taken a night and 2. because gold better represents the chic glam of South Beach.


Materials used:
- plain white paper
- one sheet of mint green paper from a Recollections® travel-themed kit
- acrylic paint thinned with water ( for a watercolor effect)
- glitter glue in pink and blue
- gold spray
- palm tree glitter stickers from Target
- a used dryer sheet dyed with acrylic paint
- a bottle cap as a stamp
- pink and aqua ink
- Mod Podge
- Baker's Twine
- Washi Tape
- pink cardstock
- my Silhouette Cameo


Quick and Simple Fall Decoration


This is my fall decoration this year:
A small pumpkin, wicker balls in different sizes, chestnuts in a vase, a burlap rose bouquet, dried leaves and sunflowers from my birthday bouquet and this adorable little paper ornament by madewithlovebyhannah.com


A city tour and our love lock

Today i wanted to share a few photos from our city tour some weeks ago. The operative word is "wanted", because the moment i pushed my camera's shutter for the first time, it said " no memory card". Whaaaat????
Yeah, that stupid, brainless, idiotic blogger forgot to remove the camera's memory card from her laptop.
The camera does not have an internal memory, and we had both left our mobile phones at home. So no photos of the only city tour we ever made after having lived here for more than seven years. A tour that costs 20€ per person. No photos of the only time we ever crossed the "bridge of fear" ( as we call it).
Man, we had luxury seats in the front row of the uper deck of a double decker. BAWL!
I was devastated for a few minutes, but then decided to let go and simply enjoy the day with my sweeto.

This is a photo of the map of the tour we made:


You can see the bridge in the lower left corner. There were so many great new things to discover and so many amazing photo opportunities. Bawl again!
By the way, we did not pay for the tour as we still had a 50€ tourist voucher from our electricity provider. We spent the remaining 10€  for an umbrella. You can never have enough of those in this rainy city!

Anyway, back in April on our first anniversary we hung a love lock. You can read more about it here and here. During the city tour we noticed that the bridge railing had been removed. I know i'm repeating myself, but whaaaat???
Our lock, what happend to our lock??? I did a quick research and it turned out that the railing needs to be restored and all the locks have been...wait for it....not been thrown away but been given to a museum!
A museum!! How fab is that??? You can read more about it in this article. It is written is in german, but it basically says that all the locks will be displayed in the museum's foyer during the month of September to give the owners the chance to collect their lock. I think this is such a nice gesture.

So, that's what we did in September. Collect our lock.

The museum had put together a really sweet program for all the lock-owners, with artists and a variety of tours. We decided to join the "fan" group and learned how handheld fans were used as a non-verbal kind of communication in the past centuries.

Here are a few impressions from the day we picked up our lock and a wonderful evening at the museum:


How adorable is this wedding dress??


So, the lock is back home with us now. Can you guess what we are going to do with it on our 2nd anniversary? :)


Pinned & Done: DIY Driftwood Photo Frame

This pin:


My version:


Total time: 10 minutes
Total costs: 0€.
I already had all the materials for this project ( Baker's Twine, mini clothespins, a wedding photo and a few pieces of driftwood from our trip to the beach)

Instead of drilling holes, i simply wrapped and knotted the twine around the driftwood.

Thanks for this beautiful inspiration, Erlend!


This project is linked up to the "The Dog Days of Winter" party at Design, Dining + Diapers


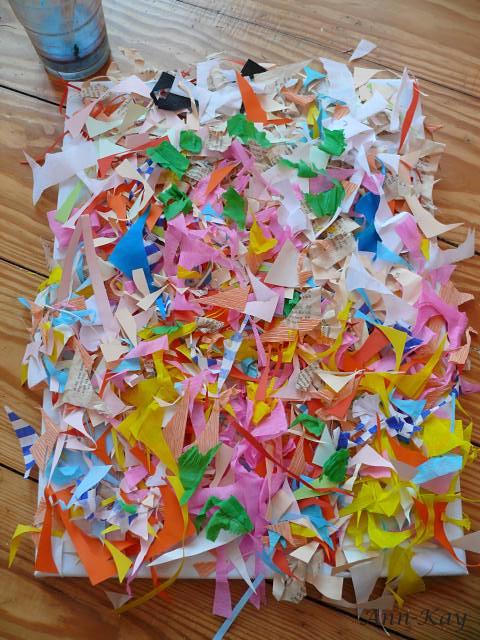
DIY: Paper Scrap Canvas Part I


Everyone who crafts with paper and fabric frequently knows this problem: What to do with all those scraps that are left over after cutting the paper/ fabric?
On the one hand you want to throw them away, but on the other hand they are too pretty and some of the paper/ fabric once cost a fortune.


My initial solution: Keep them in an empty shoe box.

Then wait for that special day of the year when your are getting so sick and tired of keeping every single bit of junk in empty shoe boxes. Now grab those scraps, a canvas, lots of Mod Podge, some water and a large paint brush or sponge, and create a fun and colorful unique piece of art.


1. Mix Mod Podge with some water ( my mixture is blue from a previous scrapbook project)
2. Generously apply that mixture to the canvas


3. Cover the canvas with your paper/ fabric scraps. Again, be genereous. You want to get rid of all of them ( because you need the shoe box to store other junk craft supplies)


4. Apply more of the Mod Podge-water mixture until the entire canvas ( and every single scrap) is covered. Drown the scraps by carefully dabbing and pressing them down with a sponge.


5. Let dry for a couple of days.

And that's it!


Stay tuned for Part II, where i am going to show you how i used some spray paint and acrylic paint and turned this canvas into a pretty beach-inspired painting.

DIY: Eyeglass Case Makeover


Before:


My eyeglass case had this awful dark blue color. One of the very few colors that i totally don't care for. Inspired by several pins ( this, this and this) i finally decided to give it a makeover with turquoise paint.


The case has a very strange surface; like a faux synthetic leather with a silky finish. And although i used a sponge, the first coat of paint did not turn out very well:


For the second coat, i dabbed the color with the tip of the sponge.


I really like that crumbly effect and the new color, but it looked a bit plain and i wasn't sure about what else to do with it. I could have covered it with fabric, lace or glitter, but i am not so much that girly type of woman. Moreover i did not want to copy the makeovers i had pinned, but rather come up with my own idea that is more "me".

"Me" means: simple, straightlined and stripes. I LOVE stripes! Not because they seem to be very trendy right now, but i have always loved them. We have striped pillow covers, striped rugs, bedding, tea towels, curtains, table runners, and striped whatnot. Even my wedding dress was striped!

So, i wanted stripes on my case, yellow stripes. Bright yellow duct tape stripes.
Affixing the tape was bit tricky because of the case's curved shape, and while writing this post i realize that i forgot to seal the paint with Crystal Clear Spray.


Anyhow, isn't the difference amazing?


This project is linked up to my favorite Linky Parties

Thrift Store Finds

There is a new thrift shop right around the corner. Unfortunately they do not sell furniture or home decor, but tons of clothing, shoes and accessories. My closet is bursting and i really don't need anything new to wear, but i could not ignore this lovely top by Zara.
Their tops usually start at 29€ but i assume this one was even more expensive because the outer lining is 100% silk. 6€ at the thrift store minus 50 percent thanks to their Summer Sale.
3€ for an almost new silk top!