A city tour and our love lock

Today i wanted to share a few photos from our city tour some weeks ago. The operative word is "wanted", because the moment i pushed my camera's shutter for the first time, it said " no memory card". Whaaaat????
Yeah, that stupid, brainless, idiotic blogger forgot to remove the camera's memory card from her laptop.
The camera does not have an internal memory, and we had both left our mobile phones at home. So no photos of the only city tour we ever made after having lived here for more than seven years. A tour that costs 20€ per person. No photos of the only time we ever crossed the "bridge of fear" ( as we call it).
Man, we had luxury seats in the front row of the uper deck of a double decker. BAWL!
I was devastated for a few minutes, but then decided to let go and simply enjoy the day with my sweeto.

This is a photo of the map of the tour we made:


You can see the bridge in the lower left corner. There were so many great new things to discover and so many amazing photo opportunities. Bawl again!
By the way, we did not pay for the tour as we still had a 50€ tourist voucher from our electricity provider. We spent the remaining 10€  for an umbrella. You can never have enough of those in this rainy city!

Anyway, back in April on our first anniversary we hung a love lock. You can read more about it here and here. During the city tour we noticed that the bridge railing had been removed. I know i'm repeating myself, but whaaaat???
Our lock, what happend to our lock??? I did a quick research and it turned out that the railing needs to be restored and all the locks have been...wait for it....not been thrown away but been given to a museum!
A museum!! How fab is that??? You can read more about it in this article. It is written is in german, but it basically says that all the locks will be displayed in the museum's foyer during the month of September to give the owners the chance to collect their lock. I think this is such a nice gesture.

So, that's what we did in September. Collect our lock.

The museum had put together a really sweet program for all the lock-owners, with artists and a variety of tours. We decided to join the "fan" group and learned how handheld fans were used as a non-verbal kind of communication in the past centuries.

Here are a few impressions from the day we picked up our lock and a wonderful evening at the museum:


How adorable is this wedding dress??


So, the lock is back home with us now. Can you guess what we are going to do with it on our 2nd anniversary? :)


Pinned & Done: DIY Driftwood Photo Frame

This pin:


My version:


Total time: 10 minutes
Total costs: 0€.
I already had all the materials for this project ( Baker's Twine, mini clothespins, a wedding photo and a few pieces of driftwood from our trip to the beach)

Instead of drilling holes, i simply wrapped and knotted the twine around the driftwood.

Thanks for this beautiful inspiration, Erlend!


This project is linked up to the "The Dog Days of Winter" party at Design, Dining + Diapers


DIY: Paper Scrap Canvas Part I


Everyone who crafts with paper and fabric frequently knows this problem: What to do with all those scraps that are left over after cutting the paper/ fabric?
On the one hand you want to throw them away, but on the other hand they are too pretty and some of the paper/ fabric once cost a fortune.


My initial solution: Keep them in an empty shoe box.

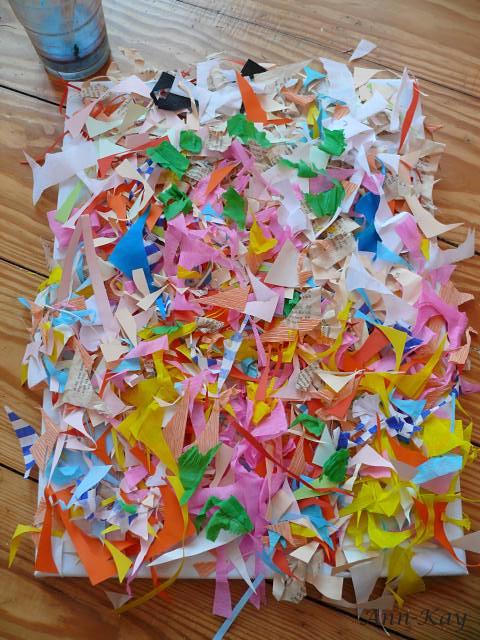
Then wait for that special day of the year when your are getting so sick and tired of keeping every single bit of junk in empty shoe boxes. Now grab those scraps, a canvas, lots of Mod Podge, some water and a large paint brush or sponge, and create a fun and colorful unique piece of art.


1. Mix Mod Podge with some water ( my mixture is blue from a previous scrapbook project)
2. Generously apply that mixture to the canvas


3. Cover the canvas with your paper/ fabric scraps. Again, be genereous. You want to get rid of all of them ( because you need the shoe box to store other junk craft supplies)


4. Apply more of the Mod Podge-water mixture until the entire canvas ( and every single scrap) is covered. Drown the scraps by carefully dabbing and pressing them down with a sponge.


5. Let dry for a couple of days.

And that's it!


Stay tuned for Part II, where i am going to show you how i used some spray paint and acrylic paint and turned this canvas into a pretty beach-inspired painting.

DIY: Eyeglass Case Makeover


Before:


My eyeglass case had this awful dark blue color. One of the very few colors that i totally don't care for. Inspired by several pins ( this, this and this) i finally decided to give it a makeover with turquoise paint.


The case has a very strange surface; like a faux synthetic leather with a silky finish. And although i used a sponge, the first coat of paint did not turn out very well:


For the second coat, i dabbed the color with the tip of the sponge.


I really like that crumbly effect and the new color, but it looked a bit plain and i wasn't sure about what else to do with it. I could have covered it with fabric, lace or glitter, but i am not so much that girly type of woman. Moreover i did not want to copy the makeovers i had pinned, but rather come up with my own idea that is more "me".

"Me" means: simple, straightlined and stripes. I LOVE stripes! Not because they seem to be very trendy right now, but i have always loved them. We have striped pillow covers, striped rugs, bedding, tea towels, curtains, table runners, and striped whatnot. Even my wedding dress was striped!

So, i wanted stripes on my case, yellow stripes. Bright yellow duct tape stripes.
Affixing the tape was bit tricky because of the case's curved shape, and while writing this post i realize that i forgot to seal the paint with Crystal Clear Spray.


Anyhow, isn't the difference amazing?


This project is linked up to my favorite Linky Parties

Thrift Store Finds

There is a new thrift shop right around the corner. Unfortunately they do not sell furniture or home decor, but tons of clothing, shoes and accessories. My closet is bursting and i really don't need anything new to wear, but i could not ignore this lovely top by Zara.
Their tops usually start at 29€ but i assume this one was even more expensive because the outer lining is 100% silk. 6€ at the thrift store minus 50 percent thanks to their Summer Sale.
3€ for an almost new silk top!


Sketch Challenge: Eco-friendly Wedding Album Page

I have been working on my DIY wedding scrapbook album for a while now, and the pages are slowly beginning to look nice. A few days ago i stumbled upon Scrap 365 and decided to participate in their monthly sketch challenge. I have never created a page based on a sketch, but it was fun and i think it is fascinating how everyone ends up with a completely different result based on the same layout. It's like Ikea furniture: everyone buys the same items, but no two rooms look the same.

This is the sketch:


And this is my result:


It is one of my "Getting Ready" pages. The zipper of my dress did not close in the first place, and in my best hysterical voice i yelled something like "Oh my God, it DOES.NOT.FIT!!!!" But of course it did, and these photos show my relief-after-panic laughter.

The layout looks a bit cramped because i'm trying to craft as eco-friendly as possible and prefer to cut my pages from used food packaging ( cereal boxes and such). Moreover, i really like that imperfect look.
So the size is only A5 instead of 12x12 ( 30x30).

I did not take photos while creating the page, as it was already late in the evening and dark outside, and nobody wants to see crappy pictures taken under artificial light ( nobody wants to see photos of my messy craft table aka our dinner table either). But this is what i did:

Although i have a huge stash of pretty, gorgeous, to-die-for scrapbook paper i rarely use it because it is too pretty and precious and i rather keep it for that one perfect occasion one day ( sounds familiar?). So for this layout i used pieces from my "junk paper" stash. Yes, i am of of those people who keep the wrapping paper from gifts they receive, because you know, it can be ironed and reused.

Those of you who have been following my blog for a while already know that turquoise is my favorite color and that we had a destination beach wedding in Florida; choosing our wedding color was an easy and given task. Therefore the album pages will mainly be in shades of turquoise and white.

So, at first i covered the piece of cardboard with Sparkle Mod Podge and a white paper napkin. Once it was dry i covered the napkin with turquoise crepe paper. Crepe paper is awesome because it is not color-fast, and applying a mixture of Mod-Podge and water creates a wonderful crinkled water-color effect.
The brown paper is baking paper and the turquoise paper is said used gift wrapping paper, both ripped into pieces. The white paper is actually paper twine that i untwisted.
The dots are punched from those papers too, and i included a few dots punched from an old craft catalog. I wanted to punch the baking paper as well, but it did not work and almost destroyed the punch. So, don't try that! Also, baking paper does not stick well because of its non-adhesive surface, so you have to sand it first with a rough sandpaper.
The "i do" sticker is one of the first things i cut with my new Cameo from a recycled piece of vinyl ( a leftover from a wall decal sheet). The dimensional effect is created with a  transparent pearl pen.
I also included bits of burlap. Those are from a cake topper i tried to make for my Etsy shop, but it was a fail.

By the way, Sparkle Mod Podge is awesome! At first i had no idea what to do with it, but now i LOVE it, especially in combination with turquoise!


So, that is my first sketch layout ever. What do you think?
I know it's not perfect and i could have done much better, but sticking to a determined layout is completely different from scrapping freestyle and it is actually much more difficult than i thought. But i like it anyway, and after all, scrapping is not about perfection but about the process and having a great time while crafting.

I will be sharing more pages once the album is finished. Next year or so.

Travel: Warsaw Weekend Getaway


This weekend we finally made our trip to Warsaw. I must admit that i never would have chosen Warsaw or Poland as one of my "must-see" destinations, but the city's Old Town is extremely charming with those beautiful, old and colorful houses and it was well worth a visit.
We stayed at a 5* hotel that definitely does not deserve the fifth star due to the lack of excellent customer service and cleanliness. But we had a nice time nonetheless.

Flea Market Finds


- Winterling Schwarzenbach "Indisch Blau" gravy boat: Null, nada, niente, nothing!!!
- a large shopping bag full of paper and cardboard: 0€
- super cute mustard yellow ballet flats, brand new, never worn: 3€
- and some random junk items for free, as always in the late afternoon

A Mini Summer Vacation Part II

The next day we explored our own city. Had not been to the "Hafencity" for a long time now, and boy, this place has become huge! It is now indeed a city within a city with dozens or perhaps even hundreds of new buildings, and still a giant construction area. Fantastic! Clearly i would not want to live there but the contrast between old and new is stunning in some way.

So, this post is mainly a collection of photos of architecture. You will notice that i have that strange preference for taking photos of building fassades from an angle. This is not very artistic and must seem boring to everyone else, but i enjoy it anyhow.
And no, i don't really care that my mother made fun of me because in her opinion i am silly and "act like some kind of super photographer" (<= original quote) just because i am not ashamed to lay down on the ground in public or almost sprain my spine in order to bring my eye's vision to film memory card.
I know that i am not a photographer! I own a six-year old non-SLR digital camera, i shoot in automatic mode most of the time because i am too lazy to adjust the settings manually, my photos are blurry because i rarely use the tripod for that same laziness reason, and my editing is minimal because my editing skills are minimal. I simply love photos plus i happen to prefer images of angles, fractions and reflections over shots of the entire building, alright??

Ok, then here we go:


Happy Birthday MisterT!!!


The very best husband in the world ( aka my husband) turned 29i today. In other words: he is 38 now.
I am ill with a terrible sinus infection, yet i woke up at 5:20 in the morning, ugh.
However, this gave me enough time to prepare my Mister's birthday table, make a cake topper, go to the grocery store and make the cake. The banner is at least 20 years old and a leftover from my childhood, it has been taped several times and an absolute must on every birthday.
My gifts are lots of sweets as always, this super cute wooden squirrel tape dispenser ( he LOVES squirrels!)  and another Etsy item that has not arrived yet because it comes all the way from Australia and i ordered too late.

Not sure how we are going to spend the day; we might go out for breakfast or dinner, but in any case:

HAPPY BIRTHDAY SWEETO!!!

A Mini Summer Vacation Part I


My parents are here to visit us and with rare sunny skies and warm 24°C we I made the decision to drive up north and spend a day at the beach. It has been more than a year now since the last time we saw the ocean, and although the Baltic Sea cannot compete with the North Sea or Atlantic Ocean in the least, it is still better than nothing.
Four days off from work in a row is the most i can get this year, so this day at the beach was kind of like my mini summer vacation. My dad did a search on Google to find a hidden place where i could collect some driftwood and after a one-hour drive we ended up in the middle of nowhere. If you are a city girl like me, you cannot imagine the incredible quietness  of this place. No traffic noise or humans let alone cars. Nothing but the chirping of birds and the soft whistle of the wind. Wonderful!

Our wedding in a magazine!

Our wedding is featured in the most recent issue of the WeddingStyle magazine!!

It's been one year and three months since we got married and i am still so in love with our beautiful photos ( taken by Kristen Wynn), my aqua shoes and my wonderful husband, of course!